汎用している牛乳パックで作成した直方体の焼き型(7cm x 7cm x 33 cm)を使用します(作成方法は→カステラを焼くを参照)。使用した材料は、ココアパウダー(Ven Houten COCOA)、バター(北海道バター、雪印メグミルク)、ファットスプレッド(ネオソフト、雪印メグミルク)、牛乳(酪農牛乳),、以下はすべていつもの材料です。
Cocoa Paste
total volume ≒ 140 gram
Pure Cocoa Powder
28 gram
Water (Boiling Water)
55 gram
Superfine Sugar
55 gram
Baking Soda
1.2 gram
Cocoa Powder: Note that baking soda has been activated since it was combined into the mixture.
Flour Mixture
total volume ≒ 250 gram
Cake Flour
173 gram
Bread Flour
70 gram
Baking Powder
7 gram (2pack)
Flour Mixture: The protein concentration of the flour mixture is about 11%.
Basic Butter
Total 942 gram
Salted Batter
170 gram
Fat Spread
107 gram
Powdered Superfine Sugar
132 gram
Whole Egg
4 e.a.
Whole Milk (warmed)
83 gram
Flower Mixture
125 gram (1/2 volume)
Vanilla Oil
a few drops
Basic Butter: Note that the powdered superfine sugar should be prepared immediately before use, that is simply made to be blended in a food blender in about 5 minutes.
Instructions: 調理法
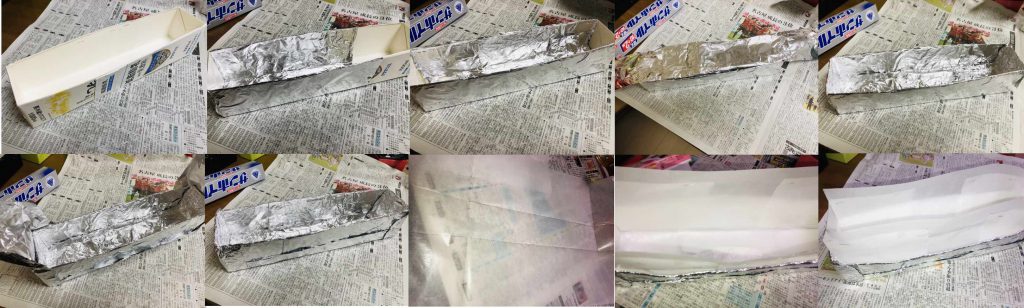
オーブンを180℃に予熱します。!L容積の牛乳パックを2つ合わせてカステラを焼くとき同様に7cm x 7cm x 33cmのカスタムの焼き型を作成します。内側にクッキングシートで作成した紙の焼き型を入れます(作り方はカステラを焼くの記事参照)。total 250グラムになります。
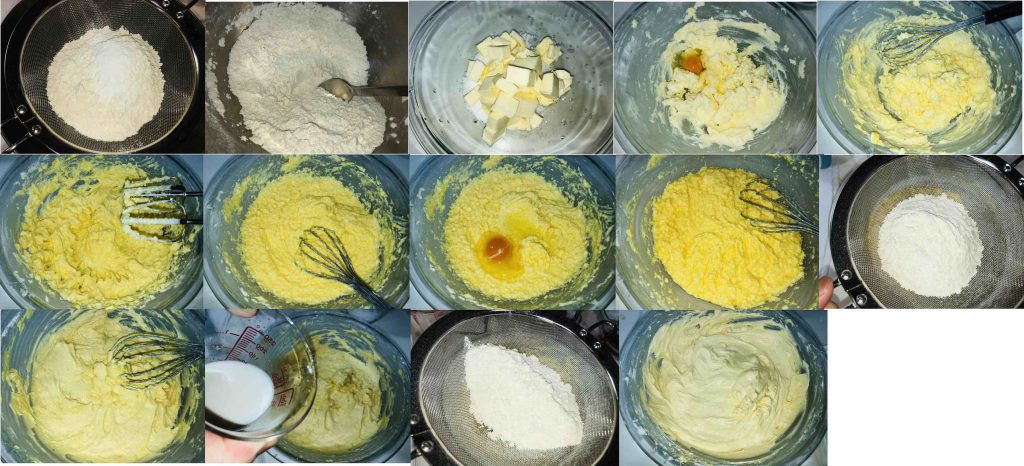
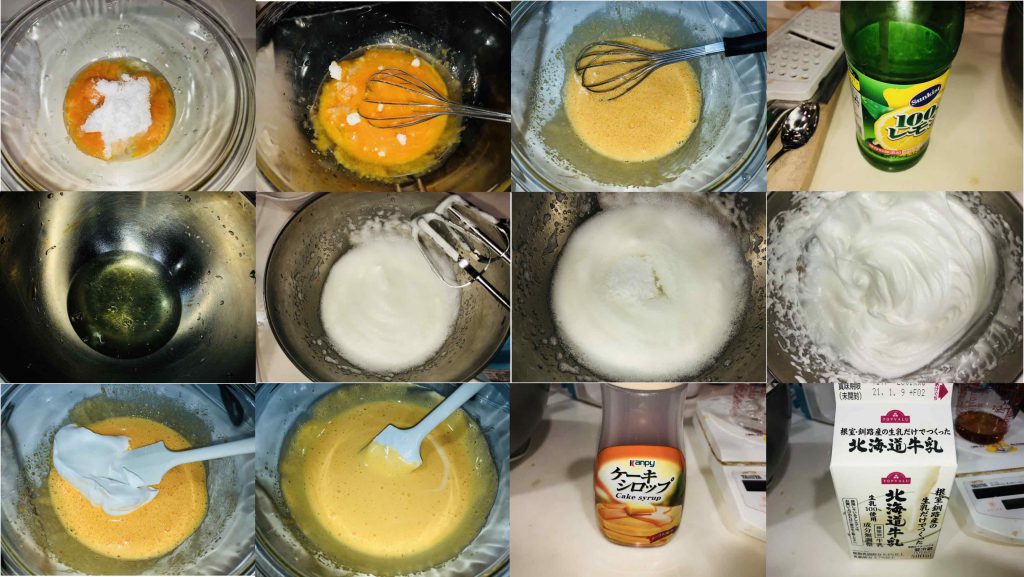
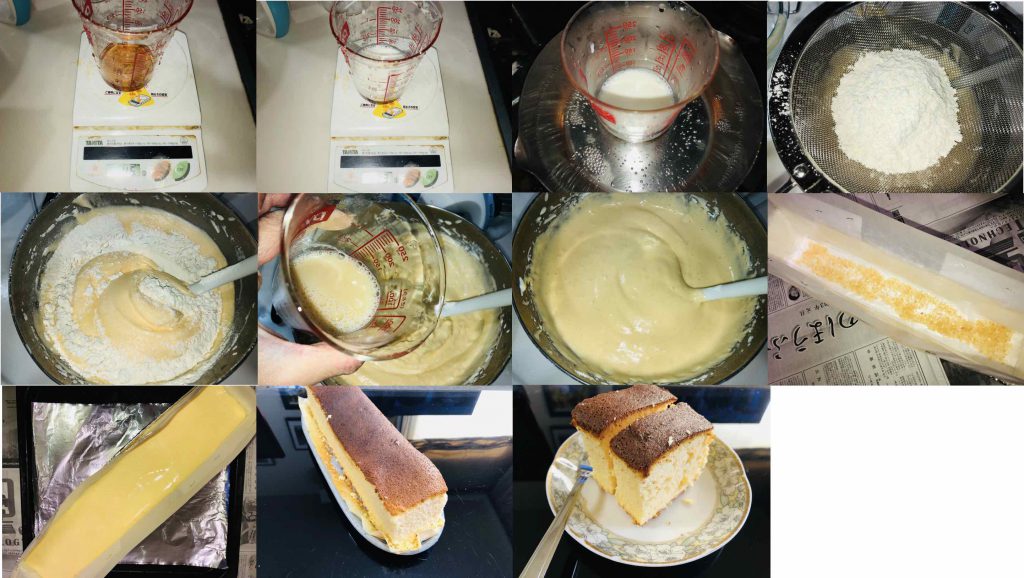
Making Basic butter: ① Prepare the flower mixture to sieve 173 gram cake flower. 70 gram bread flower and 7 gram (2 packs) baking powder all in one over a deep dish. ② In a large bowl, place 170 gram salted butter (cubed), 107 gram fat spread and 132 gram powdered superfine sugar to whisk patiently until it’s creamy. ③ Add 4 whole eggs one by one to electric-whisk until well incorporated carefully avoiding de-emulsification. ④ Sieve the half volume (125 gram) of the flour mixture over the egg-butter mixture to whisk until well incorporated. ⑤ Pour 83 gram warmed whole milk and whisk to loosen the butter. Add a few drops of vanilla oil. ⑥ Sieve the leftover of the flower mixture and whisk well. The basic butter has done.
Making Cocoa paste: ① Combine 28 gram pure cocoa powder and 55 gram boiling water in a small bowl until well dissolved. ② Add 55 gram superfine sugar and 1.2 gram baking soda to whisk until completely dissolved. ③ Let it cool at room temperature.
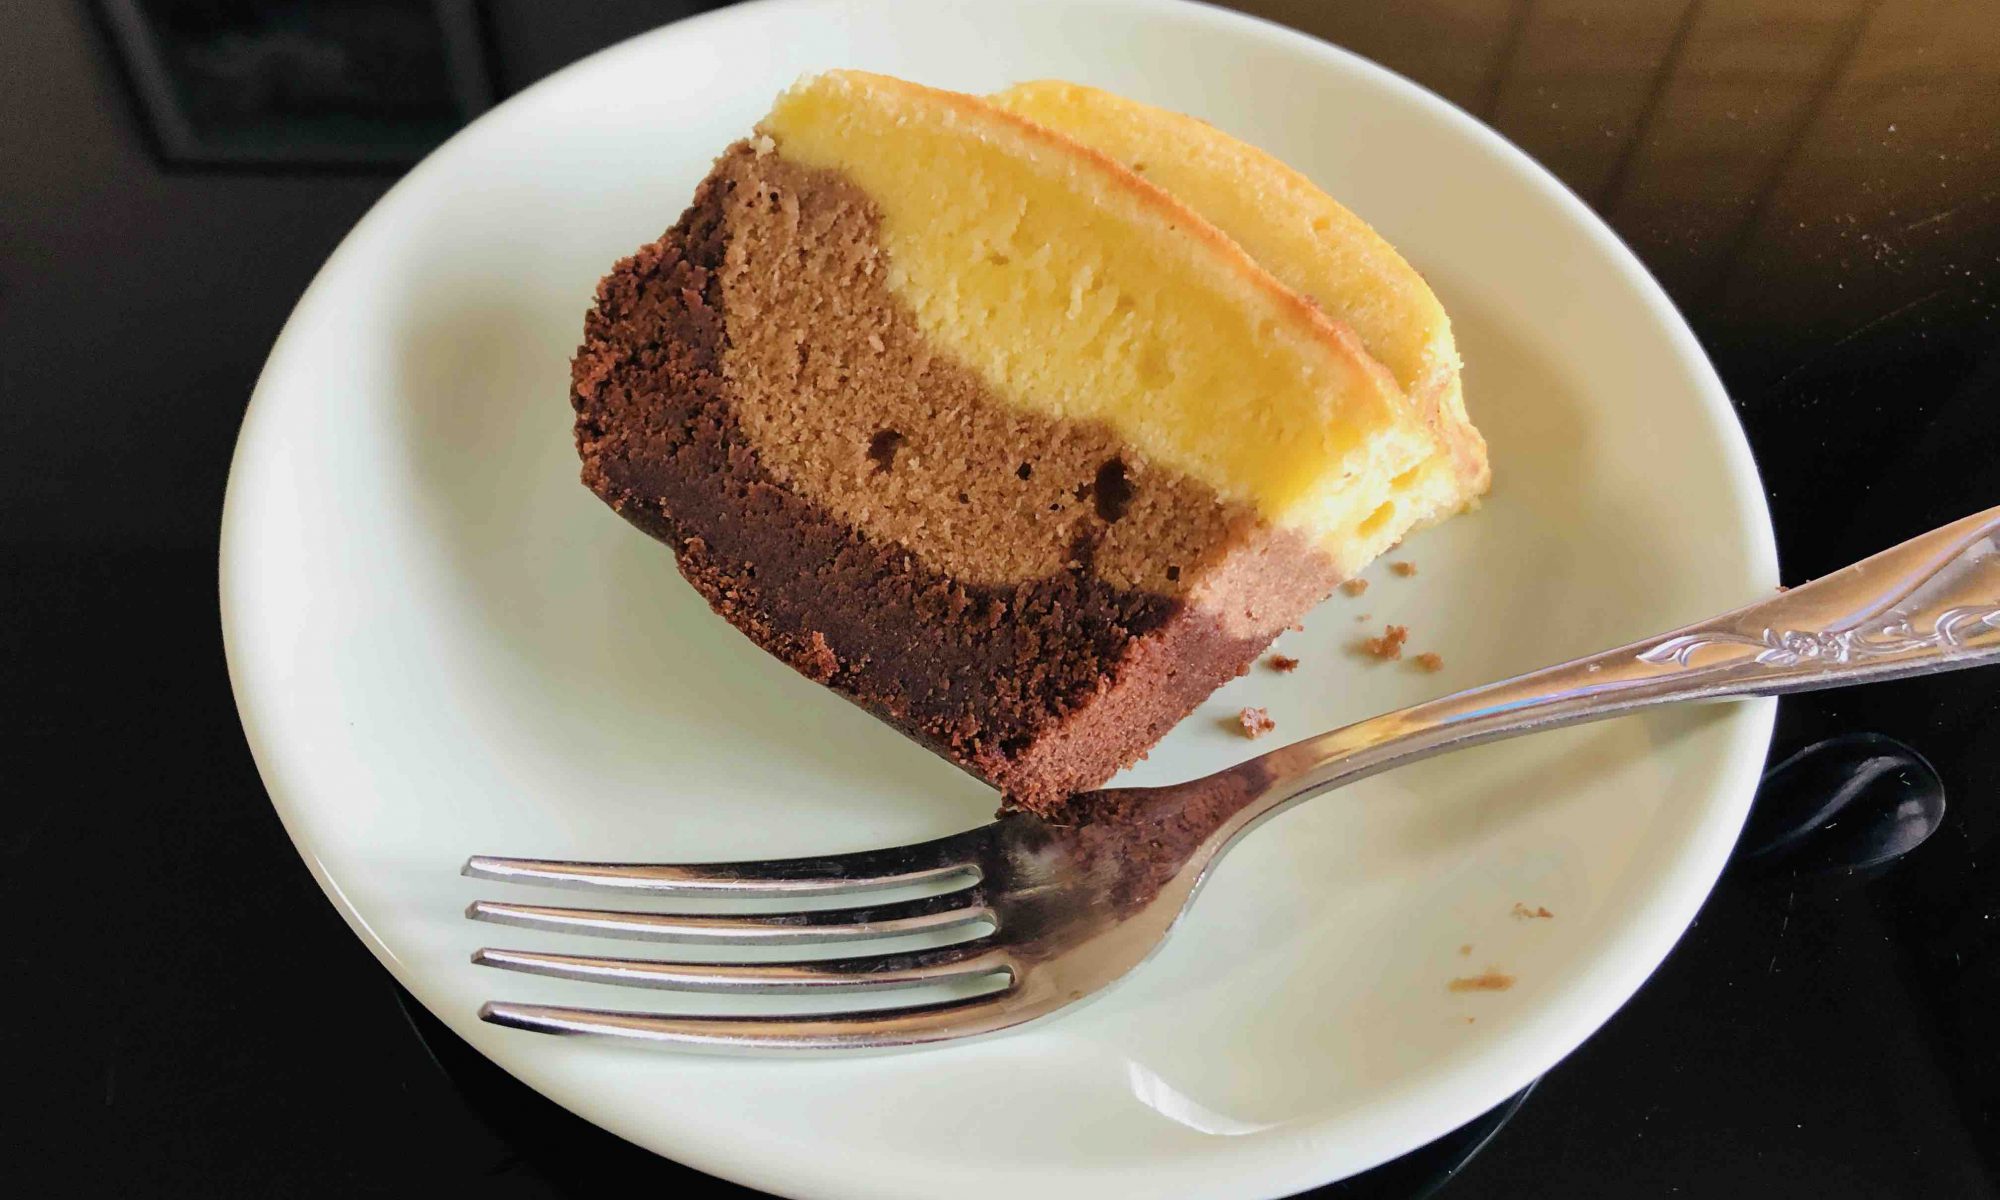
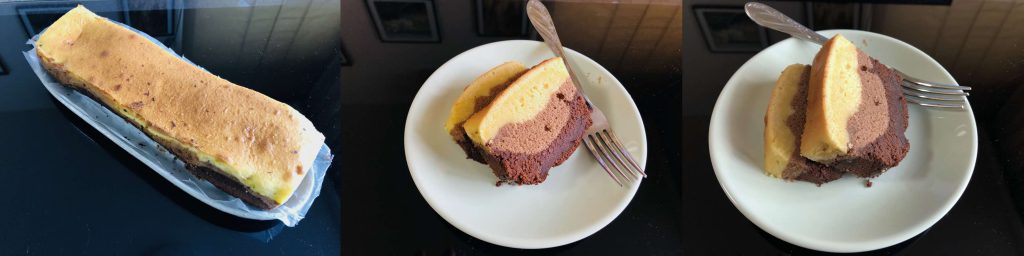
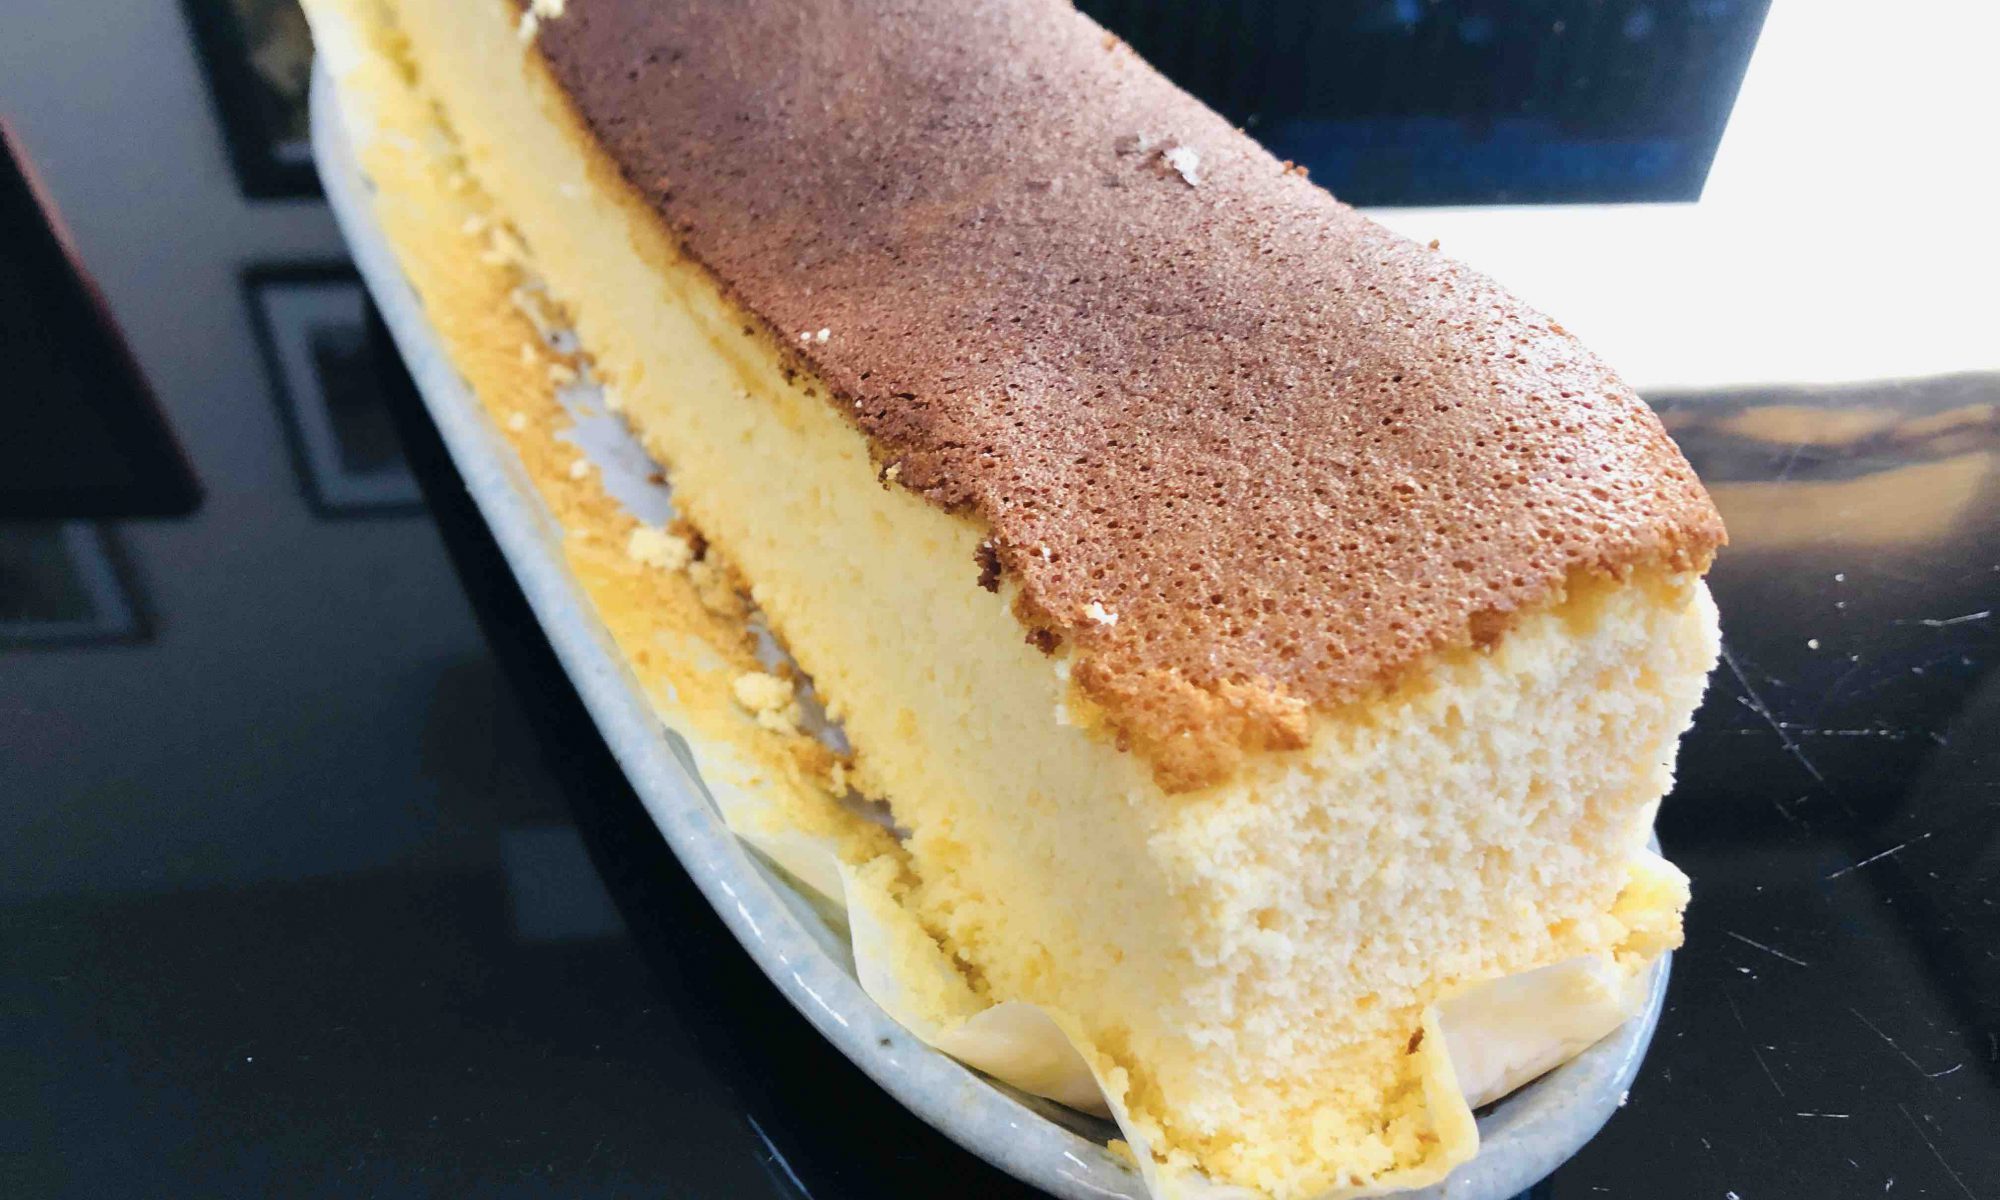
Making Cocoa Basic batter: ① Fold the 140 gram cocoa paste into the 360 gram basic batter evenly in a middle bowl. ② Pour the 360 gram cocoa in to the square mold as the 1st layer. ③ Even the surface.
Making the 2nd layer and Oven-baking: ① Fold the remaining 140 gram cocoa basic butter into the 250 gram basic butter evenly in another bowl (ie. metal bowl). ② Pour the soft cocoa butter into the mold as the 2nd layer to even the surface. ③ Finally, pour the remaining 373 gram basic butter into the mold as the top layer to even the surface. ④ Oven-bake at 180C for about 60 minutes until the surface gets golden brown.
汎用している牛乳パックで作成した直方体の焼き型(7cm x 7cm x 33 cm)を使用します(作成方法は→カステラを焼くを参照)。使用した材料は、レモンジュース(サンキスト100%レモン、サンキスト)、ケーキシロップ(メープル風味ケーキシロップ、カンピー)、バター(北海道バター、雪印メグミルク)、ファットスプレッド(ネオソフト、雪印メグミルク)、以下はすべていつもの材料です。
Basic Component of Pound Cake
Amount for 1 large custom square pan
Blended Batter
100 gram salted batter + 85g fat spread
Cake Syrup
56 gram
Whole Egg
4 e.a.
Superfine Sugar
130 gram
Lemon Juice
30 gram (even to 1 lemon)
Blended Flour
110 gram cake flour + 112 gram bread flour
Baking Powder
3.5 gram (1pack)
Lemon Essence
a few drops
Baking Trick
170C for about 40 minutes
Basic component of the pound cake : To prevent the batter sticking to the paper mold, combine butter and fat spread. Adding cake syrup will save labor on mixing the butter to the creamy.
Water Icing
Amount for 1 batch
Powdered Sugar
92 gram
Lemon Juice
18 gram
Glace a l’eau as known as water icing: Usual water icing consists of powdered sugar (with cornstarch) and water. For weekend citroen, use lemon juice (fresh lemon juice) for solvent.
Instructions: 調理法
まず、オーブンを170℃に予熱します。カステラを作成する際同様に7cm x 7cm x 33cmの大型の焼き型を牛乳パックとアルミフォイルで作成します。その内側にクッキングシートで作成した焼き型をもう一つ入れます。
①中型ボウルにバターを100グラム、ファットスプレッド85グラム、ケーキシロップ56グラムを投入し、フラワーホイッパーで混ぜます。この作業は室温で行い加熱は行いません。クリーム状になるまで丁寧に混ぜます。これでバタークリームができます。 ②大型ボウルに、全卵4個分と上白糖130グラムを入れBain-marieで混合します。砂糖が解けたら湯煎から外して、レモンジュース30グラムを加えて電動ホイッパーで供立て攪拌します。 ③リボンステージ(約3倍量になってリボン様に垂れる位のクリーム)になったら攪拌を止めます。 ④完成した卵黄クリームに少量ずつバタークリームを注ぎスパチュラで混ぜていきます。一度に混ぜ込むと分離が起こりますので注意が必要ですがこの後小麦粉を混ぜますので分離していても再び乳化してくれますので心配はいりません。 ⑤薄力粉110グラムと強力粉112グラム、ベーキングパウダー3.5グラムを生地の上から篩い、スパチュラで常法(down to up, and center to margin folding method)に基づき丁寧に小麦粉が目視できなくなるまで丁寧に混ぜます。この時レモンエッセンスを数滴加えて香りを調整します。 ⑥焼き型に注ぎ、オーブンで170℃ x 約40分焙焼します。 ⑦焼きあがったら室温で冷まし、グラスアローを上からかけます。 ⑧冷蔵庫で冷やして完成です。
Making Pound Cake: Preheat the oven up to 170C. Prepare 7cm x 7cm x 33㎝ paper square mold aluminum foiled with using 2 mill packs. Place parchment-paper mold within the aluminum foiled mold. ① Combine 100 gram salted batter and 85 gram fat spread, 56 gram cake syrup in a middle bowl until it gets creamy. ② Place 4 whole egg and 130 gram superfine sugar in a large bowl over the double boiler (Bain-marie). Mix well until the sugar is completely dissolved. Remove from heat and pour 30 gram lemon juice to electric-whisk until the ribbon stage (about triple volume), ③ Pour the batter cream in 3 to 4 batches into the creamy egg mixture to fold gently until well incorporated. ④ Sift 110 gram cake flour, 112 gram bread flor and 3.5 gram baking powder over the butter to fold it according to the down to up folding method. Add a few drops of lemon essence. ⑤ Pour the batter into the mold. Oven-bake at 170C for about 40 minutes. Then cool it at room temperature. Pour the water icing over the top.
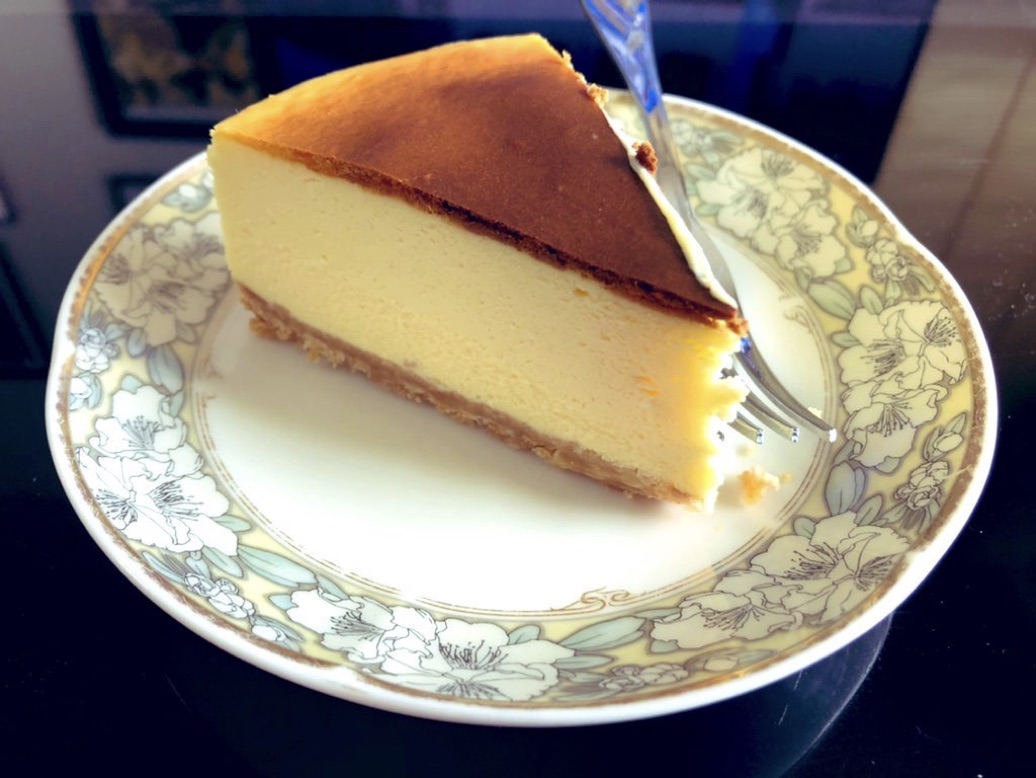
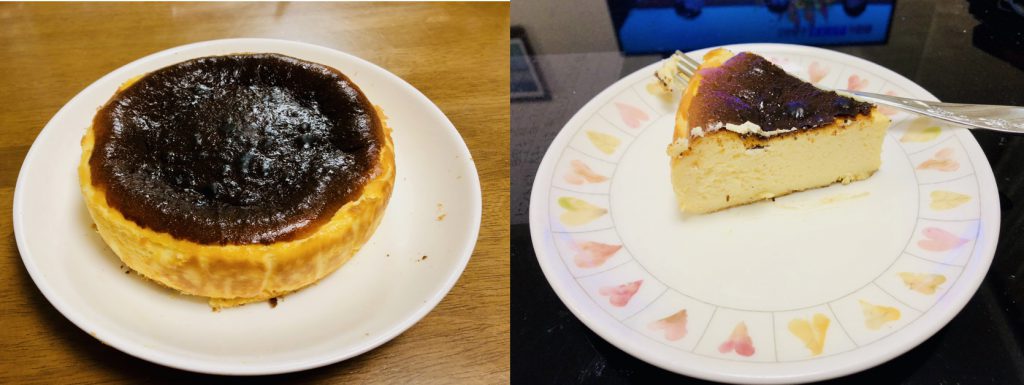
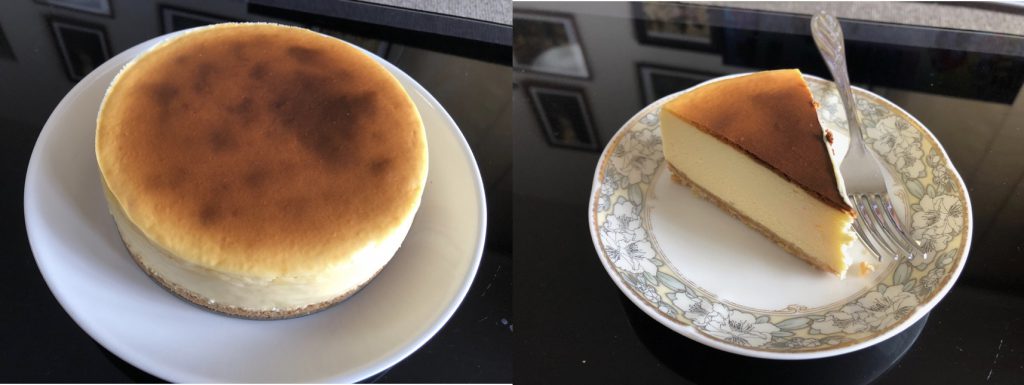
New York cheesecakeは、濃厚でしっとりしたclassical cheesecakeの代表格として有名で完熟しきっていないクリームチーズ、卵、コーンスターチ、サワークリームを用いて作成するのが特徴です。オリジナルな調理法は、湯煎法を用いず400oF(≒200℃)で10分表面に焼き目をいれた後、225oF(≒110℃)で25分追加焙焼を行う2段階焙焼を基本としその後オーブン内でクーリング(約1hr)することで十分に焼き進みを加えて仕上げるようです。最近は湯煎焼き(hot bath)を用いたレシピが主流となっているようなので湯煎焼きで仕上げてみました。
Biscuit Plate: Any available biscuit can be substituted for the basal biscuit plate.
Cheesecake Batter
Amount for φ18cm cake pan
Cream Cheese
500 gram
Superfine Sugar
82 gram
Coarse Salt
3 gram
Lemon Juice
5 gram
Whole Egg
2 e.a.
Sour Cream
100 gram
Cornstarch
10 gram
Vanilla Oil
a few drops
Baking Trick
160C for about 90 minutes (hot bath)
Cheesecake batter: No heavy cream ia added.
Instructions: 調理法
まず、オーブンを180℃に予熱します。
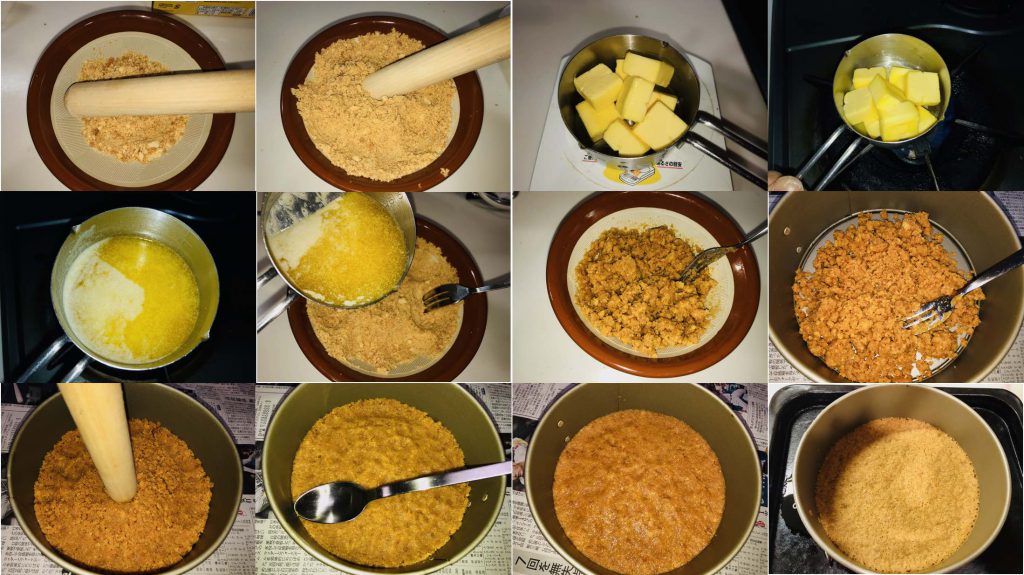
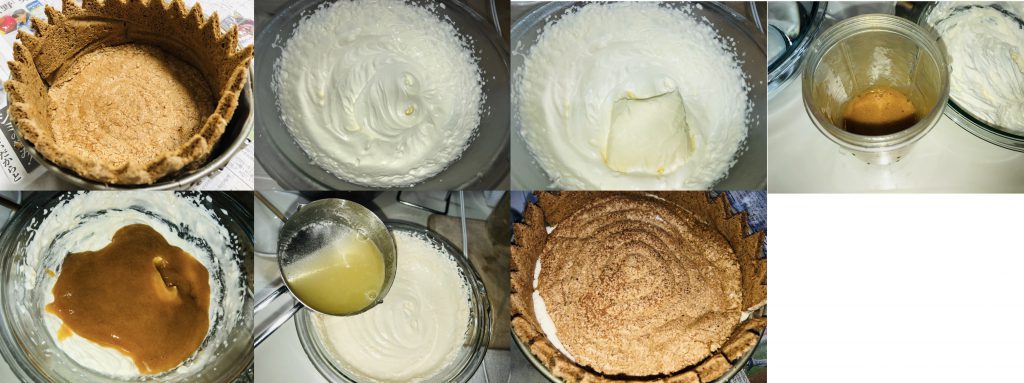
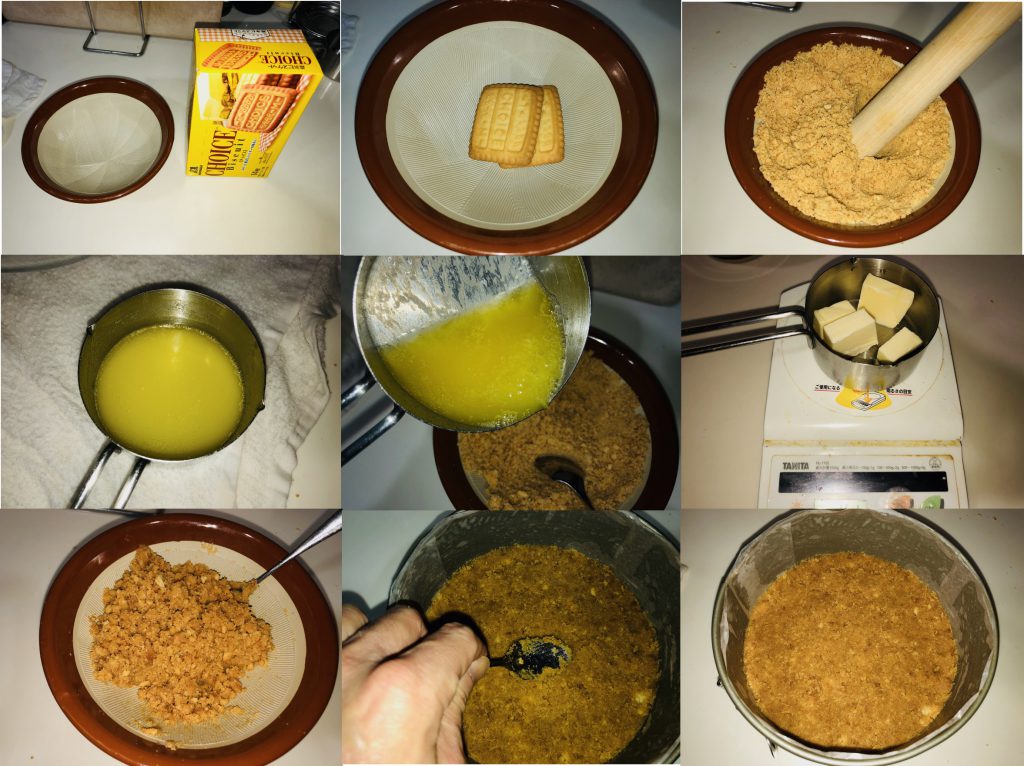
<1>ビスケットプレートの作成 ①すり鉢にビスケットを入れ、すりこぎ棒で丁寧に粉砕しビスケットパウダーにします。全部で120グラム使用します。 ②バターを60グラム用意し、バーナーで加熱して溶かしバターにします。 ③ビスケットパウダーに溶かしバターを加えフォークで均一になるまで混ぜます。 ④すりこぎ棒とスプーンを用いて表面が平らになるように圧迫して固めます。焙焼の際に割れないように丁寧に押し固めます。 ⑤180℃ x 5~6分調理します。色調がもとのビスケット様になるくらいで十分です。焦がしを入れる必要性はありません。 ⑥室温に放置します。
Making biscuit plate: Preheat the oven up to 180C. ① Place biscuits into a mortar to crush it into the powder with a pestle rod. Make 120 gram biscuit powder in total. ② Prepare 60 gram butter in a measuring cup over medium heat to get into the melted bitter. ③ Pour the melted butter into the biscuit powder and mix well with a fork. ④ Dump the butter-biscuit powder into the cake pan to press it tightly with a spoon and a pestle rod. ⑤ Oven-bake at 180C for about 5 to 6 minutes. ⑥ Let it cool at room temperature.
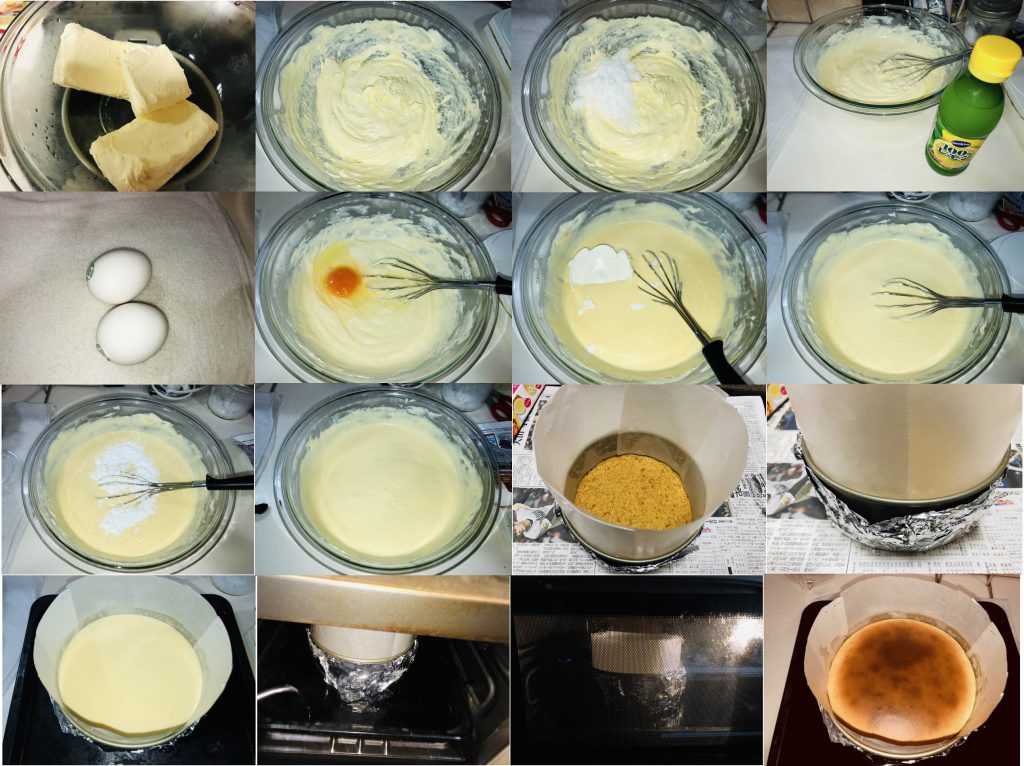
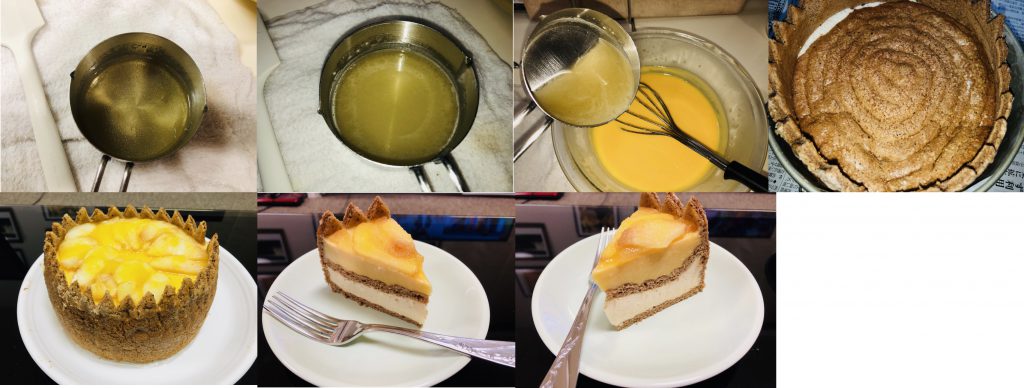
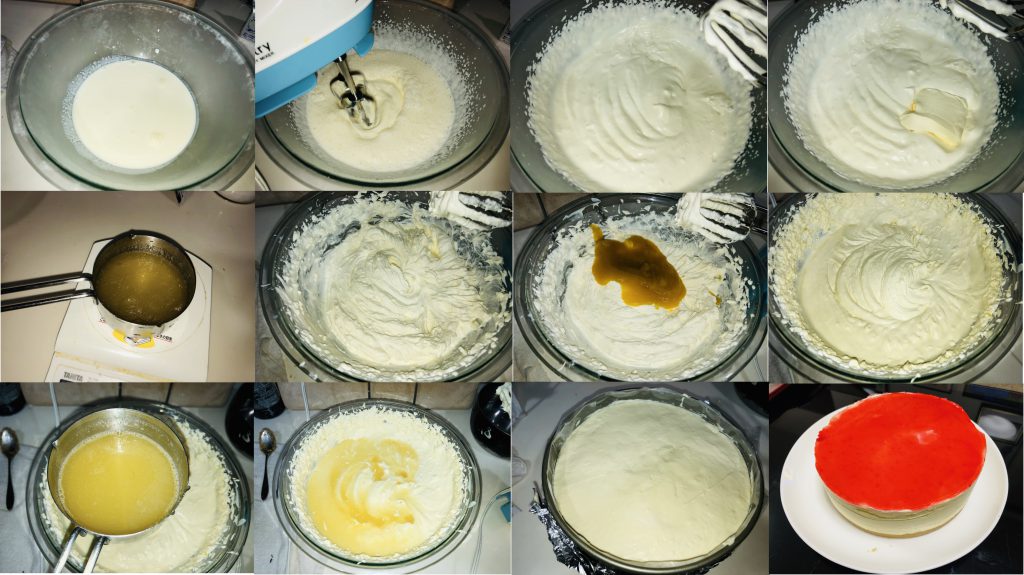
Making Cheesecake batter. In advance, line a parchment paper with 10cm height on the side of the cake pan. Cover the outside of the pan with aluminum foil doubly to avoid entering water while baking in a hot bath. Preheat the oven up to 160C. In all steps of the making procedure, do not whisk with a handy electric-mixer but with a balloon whipper.① Place 500 gram cream cheese in a large bowl over simmering water (Bain-marie) until you can easily whisk with a balloon whisk. ② Add 82 gram superfine sugar and gently whisk it well. ③ Pour 5 gram lemon juice and mix well. ④ Place a whole egg into the batter. Whisk it gently until well incorporated, one by one. ⑥ Dump 100 gram sour cream in to the batter and whisk it well. ⑦ Add 10 gram cornstarch to mix well. ⑧ Pour the batter into the prepared mold. ⑨ Oven-bake in a hot bath at 160C for about 90 minutes, Then leave it in the oven with the door half-opened foe about 20 to 30 minutes, The hot bath is prepared on poring hot water into the baking plate with the aluminum-foiled pan steeped at least 2cm from the bottom. ⑨ Leave it at room temperature on a cooling rack. ⑩Chill in a fridge over 6 hours.
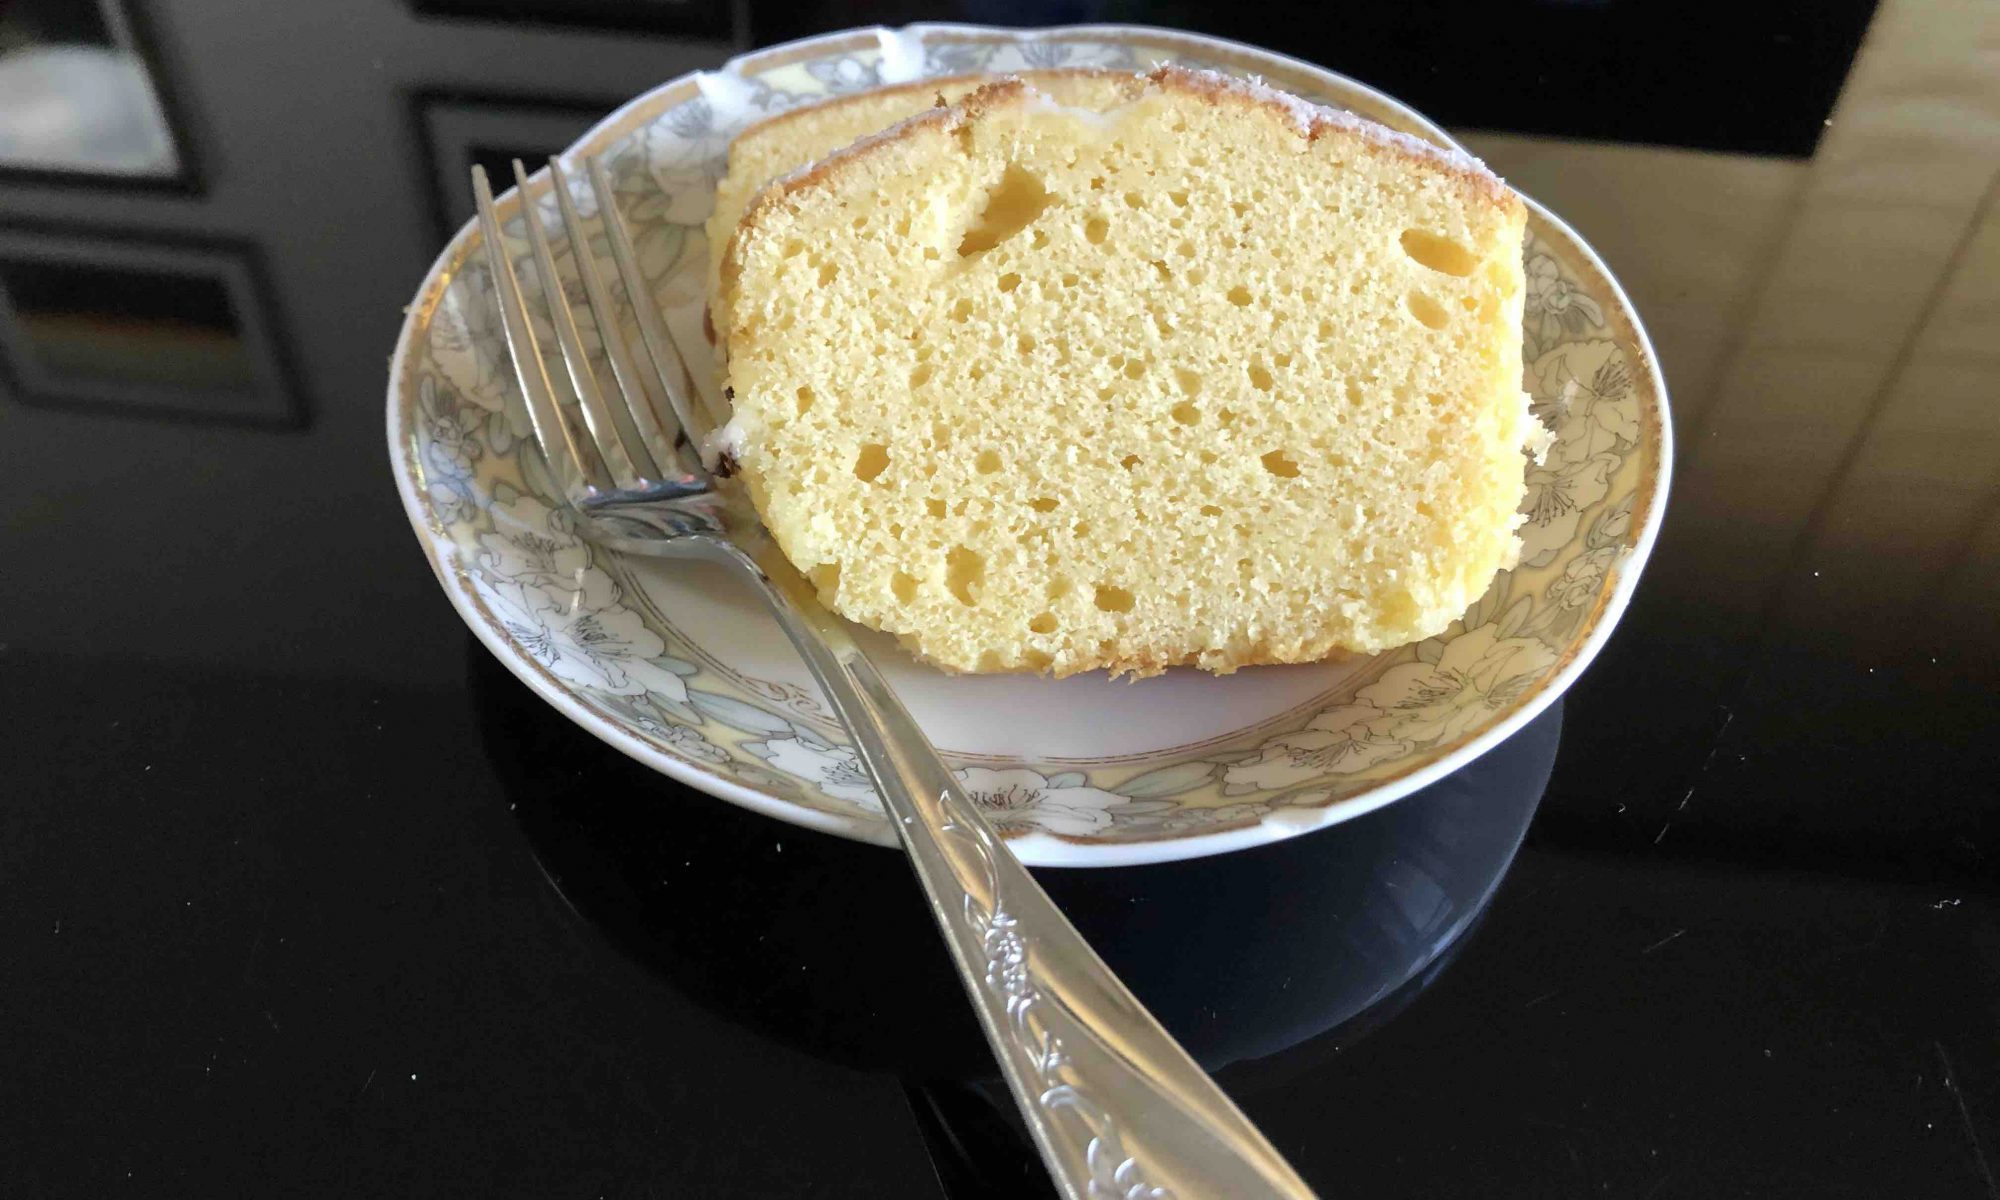
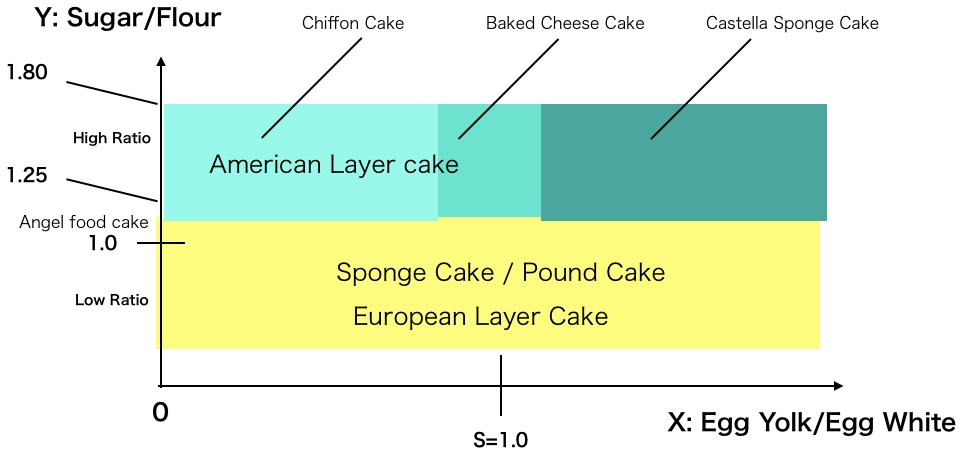
カステラは、下図上段の右に位置するhigh ratio cakeの究極バージョンになります。使用する卵黄/卵白の個数比が逆転していますので濃厚カステラを作成しようとするほど混ぜ合わせが困難になってきます。適度の保湿は焼きあがったカステラの口どけ感を左右する決定的因子となりますので必然的に強力粉主体のレシピとなります。
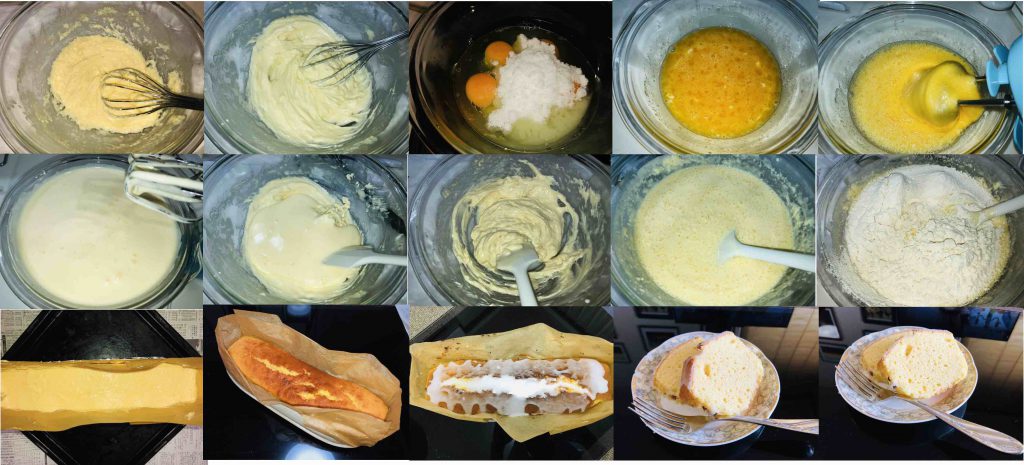
上図は1Lの牛乳パックを2つ重ねて断熱壁を作成しています(V=7cm x 7cm x 33cm)。これが我が家の天板に乗せられる最大サイズになります。上面以外が即席の断熱面となります。アルミホイルは作成が簡単になるように幅が25cmのものを使用します。理論的には外面をアルミホイルで囲う分は節約してもよいと考えますが作成を簡易化するために全体に巻き付けます。まず属面に図のようにアルミホイルを1層巻いてホチキスで止めます。次に110 cm x 25cmのサイズにアルミホイルをはさみで切断し2、続いて110 cm x 12.5cmの長方形2つに2分します。両端を織り込んで幅を7cm弱に整えます。これを内側底面からかぶせ両端の正方形面もカバーします。これをもう1層して位置が移動しないようにホチキスで止めます。 次に、内側に設置するクッキングシート製の型を作ります。幅30cmのシートを使用して、6.8cm x 11.6cm x 32.8cmの直方体の型を作成します。これもホチキスで止めて作成します。牛乳パック型の内側に設置して準備完了です。
Basic Castella Sponge Cake : The ratio sugar / flour is estimated to be about 1.64 in terms of granulated sugar.
Instructions: 調理法
①大型ボウルに、卵黄5個分と上白糖65グラムを入れBain-marieで混合します。砂糖が解けたら湯煎から外して室温でしばらく放置しておきます。 ②メタルボウルに卵白4個分を入れ、レモンジュース4グラム加えて電動ホイッパーで攪拌します。 ③加える砂糖の量が多いですので4回にに分けてsoft peak手前から加えていきます。最終的にはstiff peakとfirm peakの中間位に仕上げます。 ④go back methodに従い攪拌した卵黄とメレンゲをスパチュラで混ぜます。
Making castella sponge cake butter : ① Cast 5 egg yolks and 65 gram superfine sugar into a large bowl to mix well with a balloon whisk over simmering water in a saucepan (Bain-marie). The sugar resolved, leave it at room temperature for a while. ② Pour 4 egg whites and 4 gram lemon juice into a metal bowl. Electric-whisk until lightly whipped. ③ Gradually adding 120 gram superfine sugar in 4 batches, continue electric-whisking until firm peak form near stiff peak form. ④ According to go-back method, fold the meringue and the egg yolk mixture until well incorporated.
Making batter and oven-baking: ⑤ Pour 45 gram maple-tasted cake syrup and 45 gram whole milk into a 250 ml measuring cup. Warm it in a hot water. ⑥ Sift 150 gram bread flour over the egg yolk-meringue mixture and fold it gently gradually adding the hot milk-syrup until well incorporated. ⑦ Sprinkle 25 gram medium size crystal sugar into the cooking paper mold. ⑧ Pour the batter and flip it down a few times to remove air bubbles. ⑨ Oven bake at 170C for 10 minutes and add further baking at 160C for about 50 minutes. Do not over-bake.
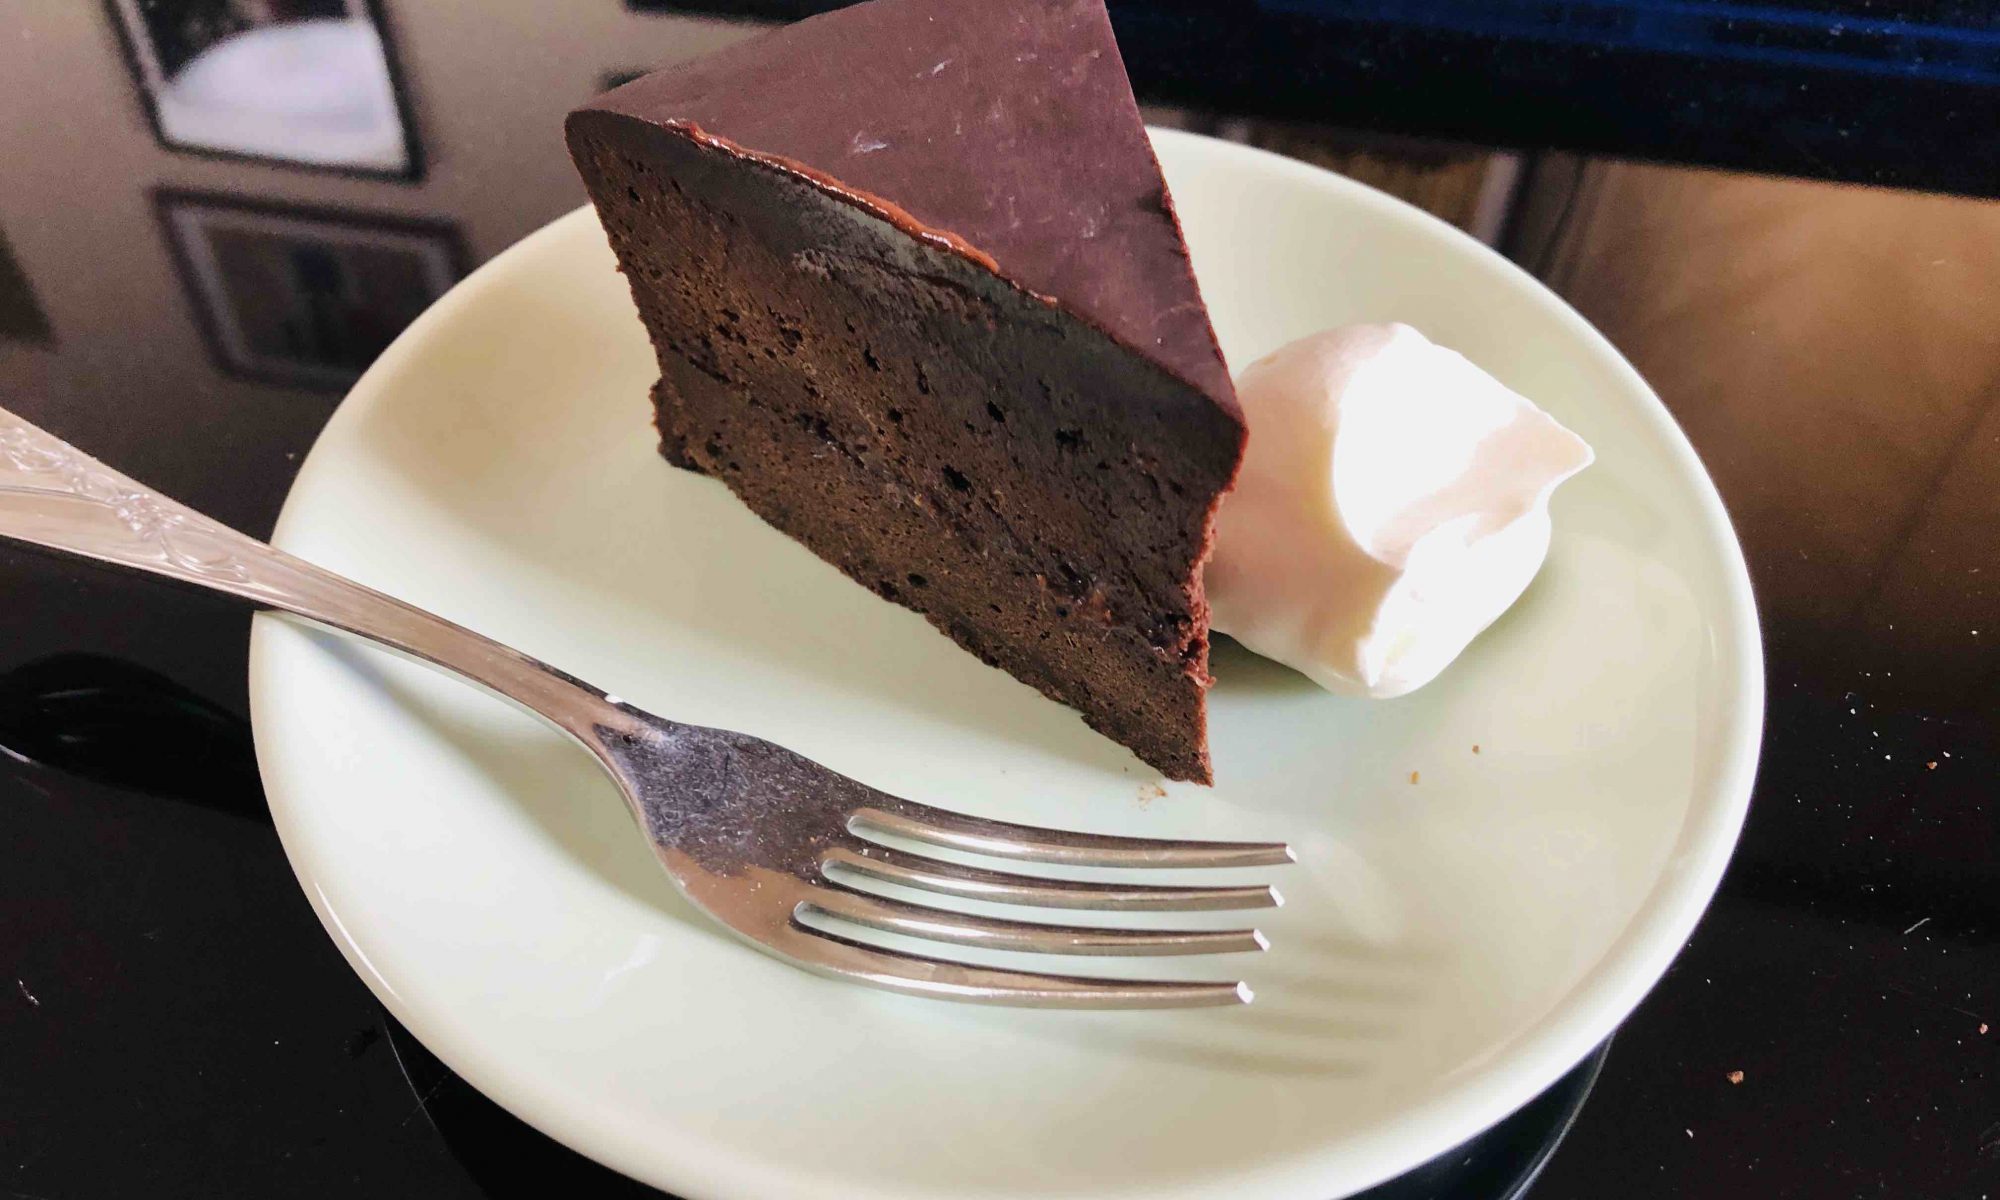
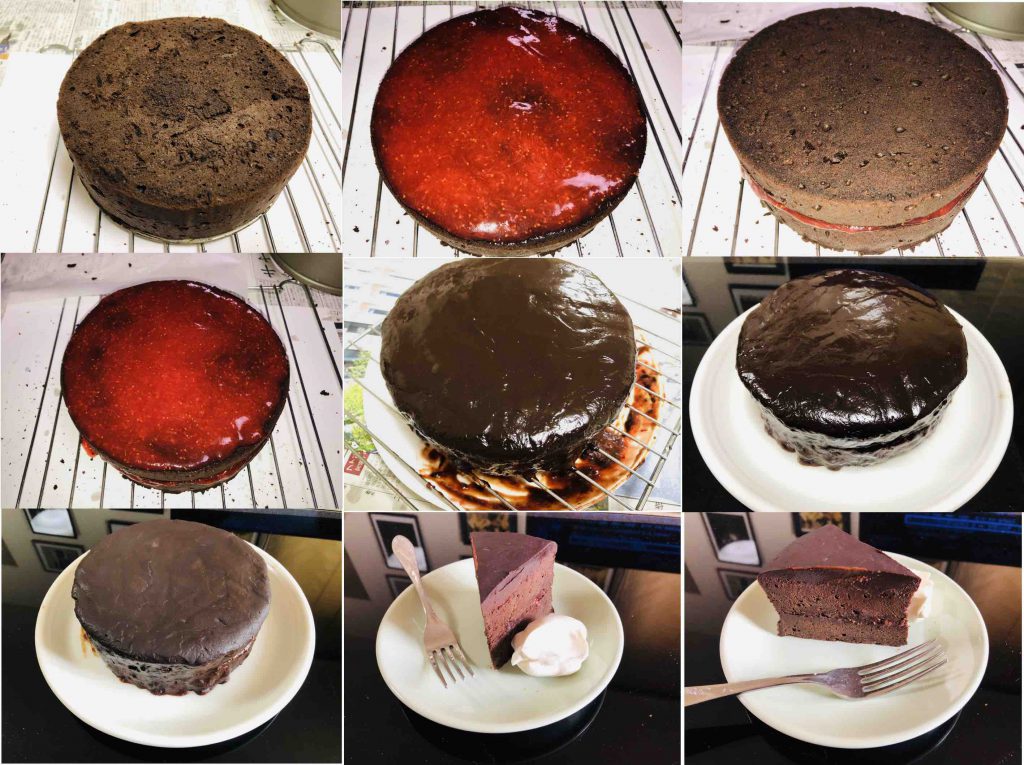
バレンタインデーも近いですので、普段あまり手を出さないチョコレートスポンジケーキの王道”ザッハトルテ”を作ってみました。”Modern French Pastry”には、”チョコレートが苦手だという者は、単に素敵なチョコレートに巡り合っていないだけだ”とある。ならばということで、”究極のストロングテイストの”大人味チョコレートケーキを”というコンセプトでホテルザッハー風のザッハトルテを作ってみました。
Strawberry Jam : When using granulated sugar, prepare a half volume (weight) of strawberries.
Sacher Chocolate Sponge Cake
Amount for φ18cm cake pan
Salted butter
210 gram
Powdered Superfine sugar
56 gram
Egg Yolk (M)
8 ea.
Dark Chocolate
210 gram
Cake Flour
125 gram
Bread Flour (Strong Flour)
60 gram
Pure Cocoa Powder
25 gram
Egg White
8 ea.
Powdered Superfine Sugar
56 gram
White Wine Vinegar
3 gram
Vanilla Oil
a few drops
Baking Trick
170C x 40 minutes plus 180C x 10 minutes
Sacher Sponge Cake : The amount (weight) of salted butter equals to that of dark chocolate, to that of total volume of flour ( cake flour, bread flour and cacao powder).
Chocolate Glaze : The volume of this recipe is just only one batch for glazing. I think it better to use 200 gram dark chocolate and adjust each amount in proportion to it respectively.
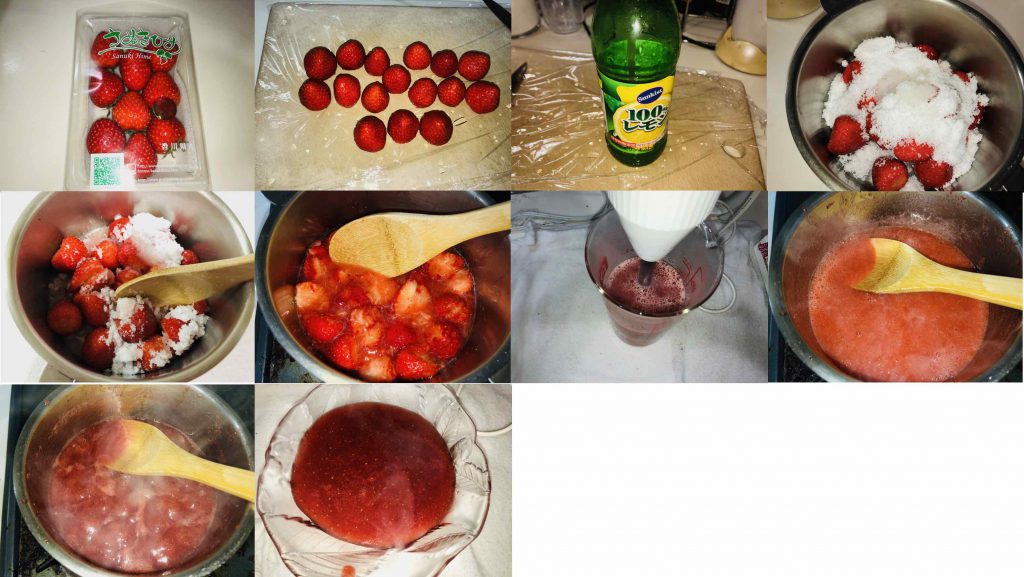
Preparing the strawberry jam for Sacher glaze: ① Place 280 gram strawberries and 105 gram superfine sugar, 6 gram lemon juice in a saucepan. Leave it at room temperature until it gets somewhat juicy. ② Crush the strawberries roughly with a wooden spoon. ③ Simmer it over the medium heat to bring it to a boil. ④ Transfer the strawberry mixture into a 500 mL measuring cup. Electric-blend until it gets in to puree. ⑤ Get the puree back to the saucepan. Simmer it over medium-low heat with stirring continuously with the wooden spoon and concentrate until you can see the bottom of the saucepan for a second when you stir the jam.
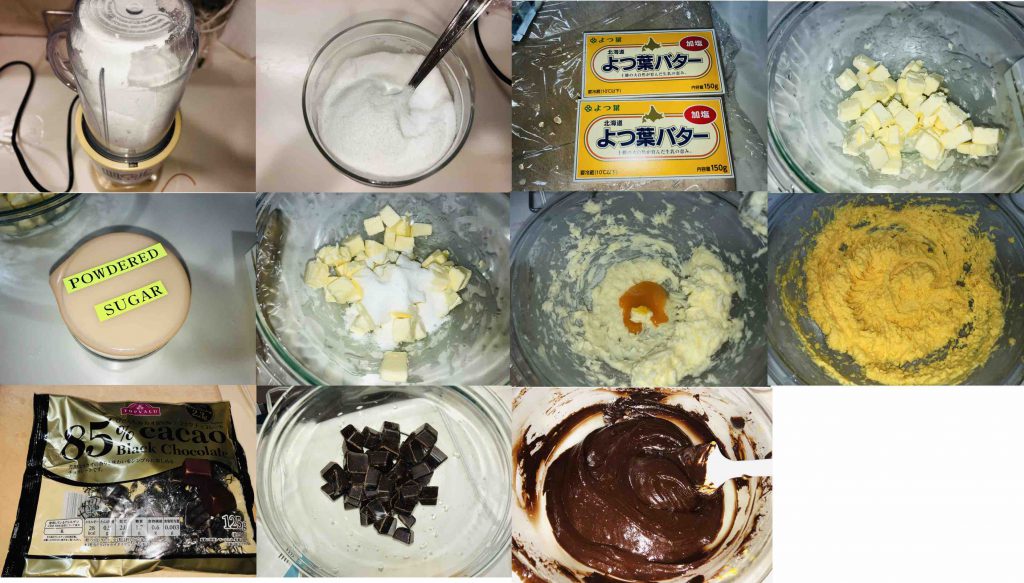
Making Sacher chocolate sponge cake : In advance, prepare powdered superfine sugar to electric-mix typical superfine sugar into fine powder. Line parchment paper on the bottom and the side of φ18 cm cake pan. Preheat the oven up to 170C. ① Dump 210 gram salted butter in a large bowl and electric-whisk roughly. ② Add 56 gram powdered superfine sugar and continue to electric-whisk until it gets creamy and well incorporated. ③ Separate egg yolks from egg white. Place 1 egg yolk into the butter cream to electric-whisk until well incorporated. Repeat that procedure 8 times until all egg yolks are exhausted. Do not mix all at one time. ④ Dump 210 gram dark chocolate into a middle heat-durable bowl. Melt the chocolate over simmering water in a saucepan (Bain-marie). ⑤ When the fluid chocolate gets a little thick, pour it into the egg yolk-butter mixture to electric-whisk until well incorporated.
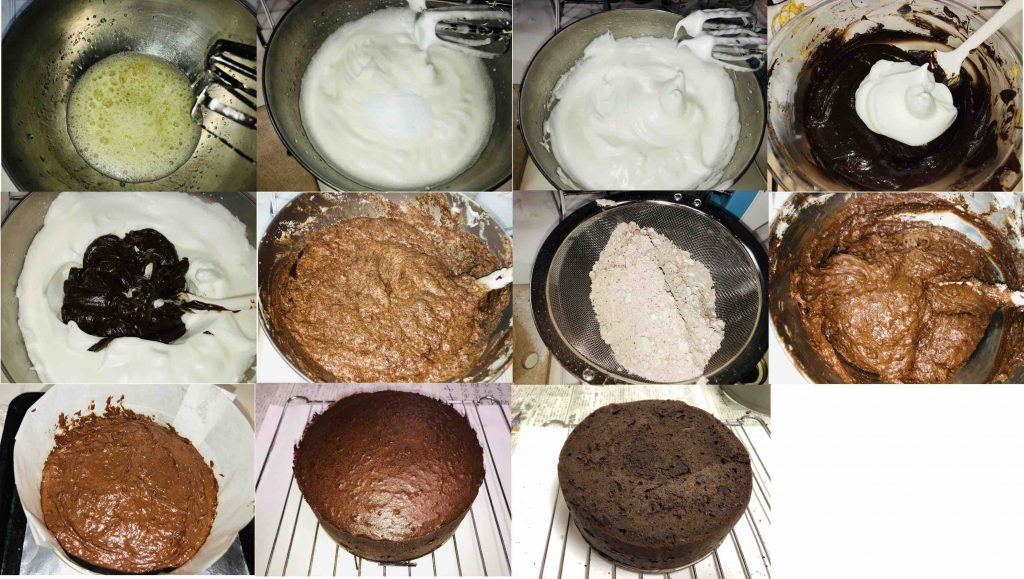
⑦メタルボウルに卵白8個分を入れ3グラムの白ワインビネガーを加えて電動ホイッパーで混ぜます。 ⑧若干soft peak気味になったところで粉砕上白糖56グラムを2回に分けて投入し、電動ミキサーで攪拌してsoft peakメレンゲに仕上げます。メレンゲの硬度をこれ以上上げると粉類との混合が困難になりますので注意が必要です。 ⑨go back methodに従いメレンゲを少量チョコ卵黄クリームに投入しスパチュラで丁寧に混ぜ合わせます。これをメレンゲボウルにもどします。丁寧にdown to up foldで均等になるよう混ぜ合わせます。この時香りの調整にバニラオイルを数滴滴下しておきます。 ⑩薄力粉125グラム、強力粉60グラム、純ココアパウダー25グラムを一度別容器に篩い、フォークで均等になるように混ぜます。塊を極力減らすためにこれをチョコレートメレンゲの上から篩います。 ⑪スパチュラで丁寧にcenter to margin & down to up foldしていきます。こんなものを本当に混ぜることが出きるのかと思える粘度ですが、丁寧に混ぜるとheavy volumeの超粘調バッターが完成します。 ⑫用意しておいたケーキ型に生地を流し込み適度に表面を整えます。この粘度では内部大きな気泡を追い出すのは困難ですが何回かトントンと机の上にケーキ型を落として気泡を追い出しておきます。170℃で40分前後焼灼したあと、竹くしで中心まで焼成できたかどうか確認(予想通り不十分です)の後、180℃で焼成10分程追加して仕上げます。 ⑬クーリングラックにおいて室温で冷めるのを待ちます。
Making soft peak meringue and batching : ⑥ Place 8 egg whites and 3 gram white wine vinegar into a metal bowl. Electric-whisk roughly at low speed until it turned white and fluffy. ⑦ Gradually adding 56 gram sugar in 2 batches, electric-whisk until the soft peak form. Do not over-whisk. ⑧ According to “go back method”, mix the soft peak meringue and chocolate dough with folding it gently with a spatula. Give it a few drops of vanilla oil on folding. ⑨ Sift 125 gram cake flour, 60 gram bread flour and 25 gram cocoa powder in a large cup to stir it well with a fork. Then sieve it over the dough and fold it gently until well incorporated. Although the butter is too hard to fold well, do not surrender to intimidation. ⑩ Pour the batter in to the cake pan. Oven bake at 170C for 40 minutes and additionally at 180C for about 10 minutes. After that, leave it on a cooling rack at room temperature.
Making Chocolate Glaze : ① Pour 75 gram water and 125 gram powdered superfine sugar in a saucepan over medium-high heat. ② When it comes to a boil, turn off the burner. Once the temperature has dropped down to 80C, dump 165 gram dark chocolate into it. Stir well with a balloon whipper.
Assembling : ① Cut the sponge cake horizontally into 2 parts of the same volume and remove irregular surface. ② Paste the strawberry jam sufficiently on the surface of the lower layered sponge cake. Put the another sponge cake on it. Similarly pour the jam on top. Lastly glaze the chocolate. ③ Chill it in a frige for about 3 hours.
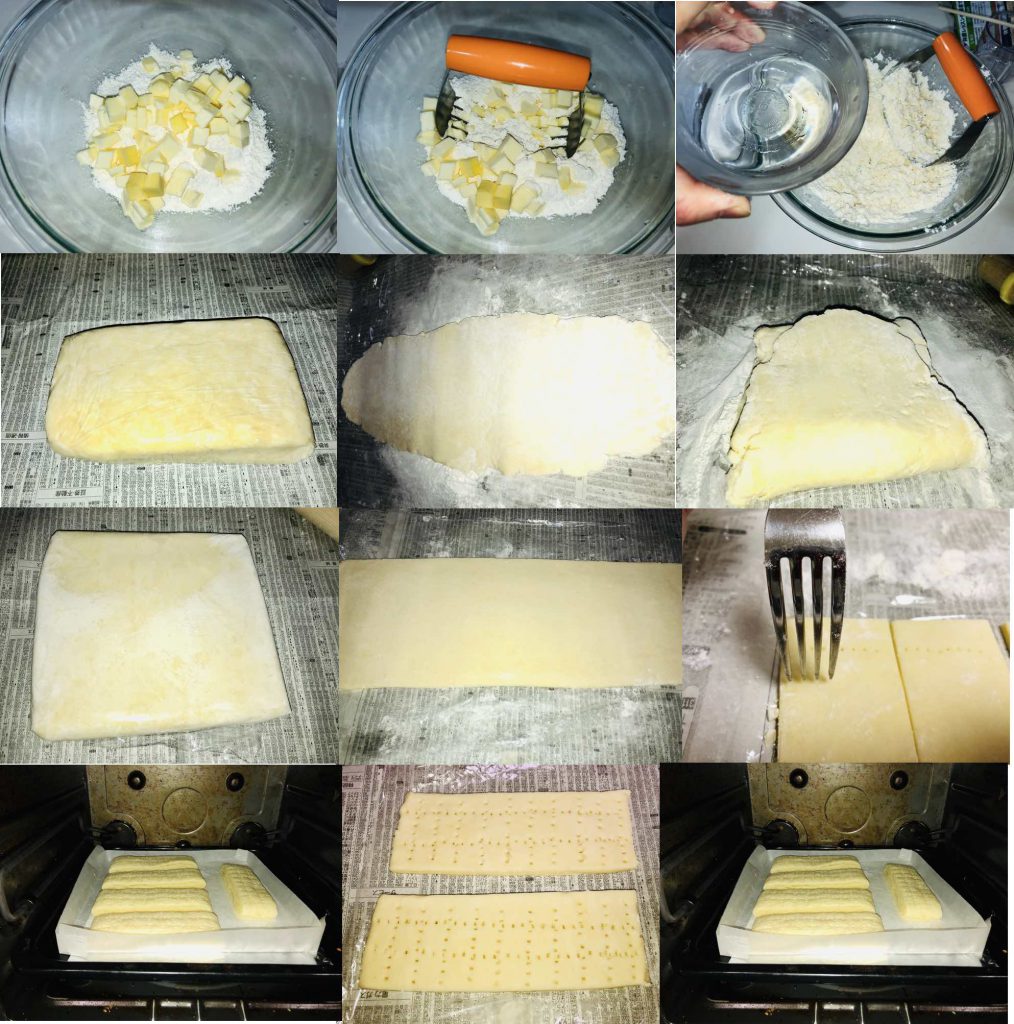
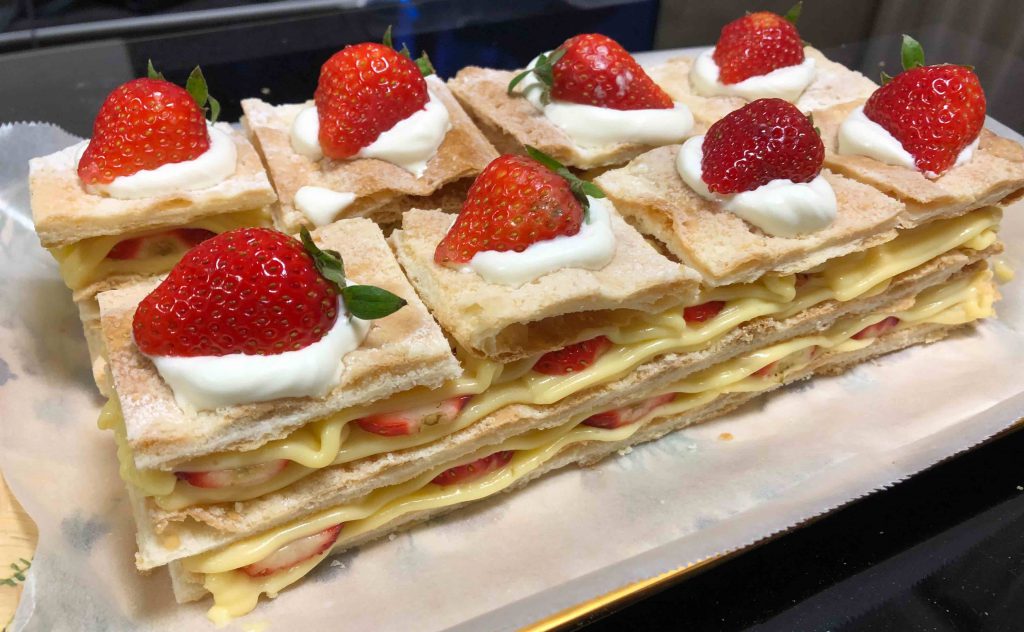
Rough Puff : All ingredients should be chilled in a fridge before use. When increasing softness, combine bread flour to make blended flour ( ie, plain flour ( ratio cake flour to bread flour equal to 1 : 1)) and add water. For instance, blending ratio is as follows: 150gram plain flour (75 gram cake flour and 75 gram bread flour), 150 gram salted butter, 70 gram water.
Creme d’amandes
Amount for 5 Mille-Feuille
Beaten Egg
25 gram (1/2 ea.)
Powdered Sugar
25 gram
Almond Flour
25 gram
Salted Butter
25 gram
Creme d’amandes : Combine each component with the same volume.
Fig Cream
Amount for 5 Mille-Feuille
Heavy Cream (cold)
100 gram
Superfine Sugar
10 gram
Fig Puree
50 gram
Fig Cream : Fig puree is previously made. Mix creme shantily and fig puree well.
Making rough puff : All ingredients, especially butter, should be chilled in a fridge before use. Preheat the oven up to 180C. ①Stir 50 gram water and 4 gram superfine sugar in a small bowl. Chill it cold in a fridge.② Sieve 210 gram cake flour in a large bowl and dump 150 gram cubed salted butter. Press to combine them with a pastry blender until the butter gets in the size of a grain of rice. ④ Pour 50 gram cold sugar water gradually into the flour-butter mixture. Gently mix with a wooden spoon to make a chunky mass. Spread the dough on a roughly floured plastic-wrap to wrap it up in a square shape. Roll the dough with a rolling pin to flatten in a square shape. Freese it for about 8 minutes. ⑤ On a lightly floured wrap surface, roll the dough until 3 times the length, to a rectangle. Fold the top third down to the center, the the bottom third up and over that. While the above mentioned sequence counts 1 set, repeat 5 sets that yields total 3×5 layers in the dough. Final version of the dough should have φ5 mm width with pressed to flatten. If the dough gets sticky during the procedure, freeze it in a fridge for 8 to 10 minute and continue. Trim the dough with a knife into a rectangle. ⑦ On the lightly floured surface of the pie, do “piquer” with a fork. ⑧ Cut into the adequate size, place it on a parchment-papered plate with appropriately powder sugar sieved. Then, dust powder sugar on the surface. ⑨ Oven-bake at 180C for about 25 minutes.
How to oven-bake an English pie : ① Before start baking, do “piquer” on a surface of the dough to release vaporized water , the pressure of that puffs up the each layer in isothermal expansion.”Piquer” removes the excess pressure. ② Sift powder sugar on a parchment paper to prevent the dough getting scorched and stuck to the bottom. ③ To make the surface flatten, place a metallic tray as a weight. ④ Oven-bake at 180C for 20-25 minutes until the surface gets golden brown. Usually, it starts to rise up in about ten minutes. ⑤ When it comes to an apple pie, cover the surface with almond cream and set sliced apples. By adding further construction , it willl become like a baker’s apple pie.
Creme d’amandes: ① Prepare 25 gram beaten egg, 25 gram salted butter, 25 gram almond flour and 25 gram powdered sugar in a small bowl. ② Whisk it with a small flower whipper until it gets creamy. ③ Keep it in a fridge until use.
Assembling : ① Electric-whisk 100 gram cold heavy cream and 10 gram superfine sugar until stiff peak form. Creme Chantilly has done. ② Add 50 gram fig puree (previously made) and electric-whisk evenly. Transfer the fig cream into a pastry bag. ③ Place the faltten pie and pipe the cream over it. ④ Set the another flatten pie on the cream and pipe the fig cream as above mentioned. ⑤ Set the pie-plate decorated with the sliced apples and almond cream over the top.
Components of Pate a Scuree : Superfine sugar gets refined into the powdered with blended in a mixer. The tart dough should be chilled in a freezer for about 10 minutes before getting pressed into flat.
Creme d’amandes
Amount for 2 portion
Salted Butter
50 gram
Powdered Sugar
50 gram
Beaten Egg
50 gram (1 ea.)
Almond Flour
50 gram
Creme d’amandes : Combine each component with the same volume.
Pear Compote
For 2 Pear
Fresh Pear
2 ea.
water
300 gram
White Wine
75 gram
Superfine Sugar
75 gram
Lemon Juice
15 gram
Vanilla Oil
a few drops
Pear Compote : Adjust the volume of sugar between 75 gram and 130 gram as you like.
Fig Cream Cheese Mousse
For 1 tart
Heavy Cream
100 gram
Superfine sugar
15 gram
Cream Cheese
100 gram
Fig puree
100 gram
Powdered gelatin
8 gram
Water (for solvent)
40 gram
Fig Cream Cheese Mousse : In advance, fig puree should be prepared.
Instructions : 調理法
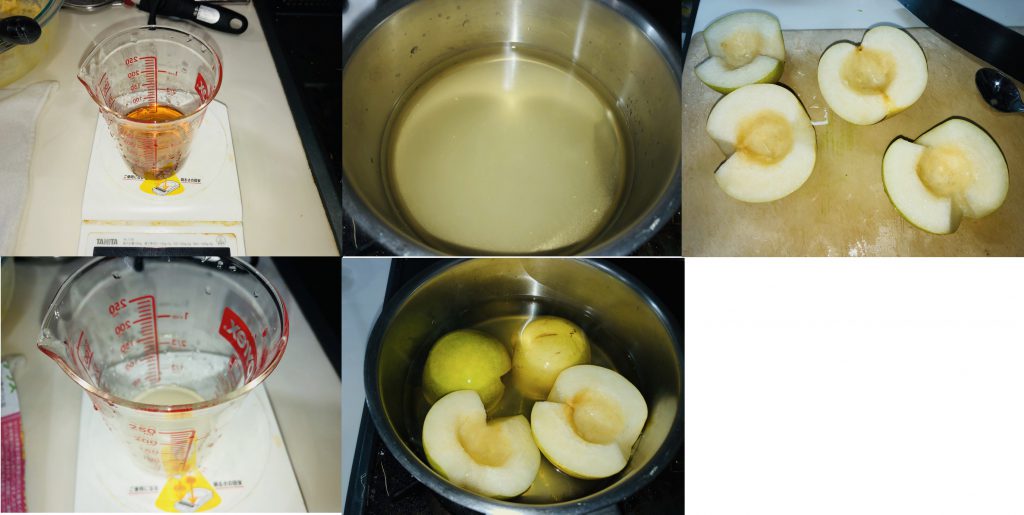
<1>梨のコンポート ① 梨を半部にカットして芯をスプーンでくり抜きます。皮は剥いておいた方が後の処理は楽です。 ② シチュー鍋に水300gグラムと白ワイン75グラム、上白糖75グラムを混ぜて中火にかけます。 ③ 砂糖が完全に解けたら、15グラムのレモンジュース、バニラオイルを数滴加えます。 ④ いったん火を切り、梨を鍋に入れます。再び中火で加熱します。 ⑤ 沸騰したら弱火におとし、鍋蓋をして15分くらい煮続けます。5分おきに梨を上下ひっくり返してすべての面がジュースに浸るようにします。 ⑥ 火を切りクッキングシートを落し蓋として上からかぶせ、室温で冷めるまで放置します。
Making pear compote : ① Cut pear into a half size and remove the center with a spoon. ② Pour 300 gram water and 75 gram white wine, 75 gram superfine sugar into a saucepan and simmer it over medium heat. ③ Once sugar gets completely dissolved, add 15 gram lemon juice and a few drops vanilla oil. ④ Place the pear with cutting side up into the saucepan and simmer it to a boil. ⑤ Decrease heat to low and cap the saucepan to simmer it for about 15 minutes. At every 5 minutes simmer, rotate the pear upside down to sink well in the juice.⑥ Remove from heat and place parchment paper on the surface. Leave it at room temperature.
Making pate a sucree : ① Place 30 gram powdered superfine sugar, 15 gram almond flour, 60 gram butter (cubed) in a middle bowl and press to combine roughly. ② Sieve 50 gram plain flour and 35 gram bread flour over it. Press to combine until the butter gets into the size of rice. ③ Pour 1/2 volume of 1 beaten egg and mix gently with a wooden spoon until the dough settles into shape. ④ On a floured surface of plastic-wrap, place the dough to fold it into the square shape. Roll the dough to flatten. Chill it in a freezer for about 15 minutes.⑤ On a floured surface, roll the dough into the 3 to 5 mm thick which should be larger than a tart pan.Making a pate a sucree : ⑥ Loosely roll the dough around the rolling pin. Place the dough over the tart pan to be unrolled. Dust roughly to push the dough into the corner to remove any gaps. Using a floured spoon, lightly press the dough from the center to margin and flatten it evenly. Cover the rim of the pan. ⑦ Move the rolling pin to and fro along the top of the pan to trim the edges. ⑧ Confirm the dough is tightly attached to the pan with no crack. ⑨ Prick the dough all over with a fork for the air to go through the dough while baking. Chill it in a freezer for about 15 minutes. Meanwhile preheat the oven up to 170C.
Making Creme d’amandes : ① Combine 50 gram butter, 50 gram beaten egg, 50 gram powdered sugar and 50 gram almond flour in a middle bowl until the dough gets creamy and well incorporated. ② Chill it in a fridge until use.
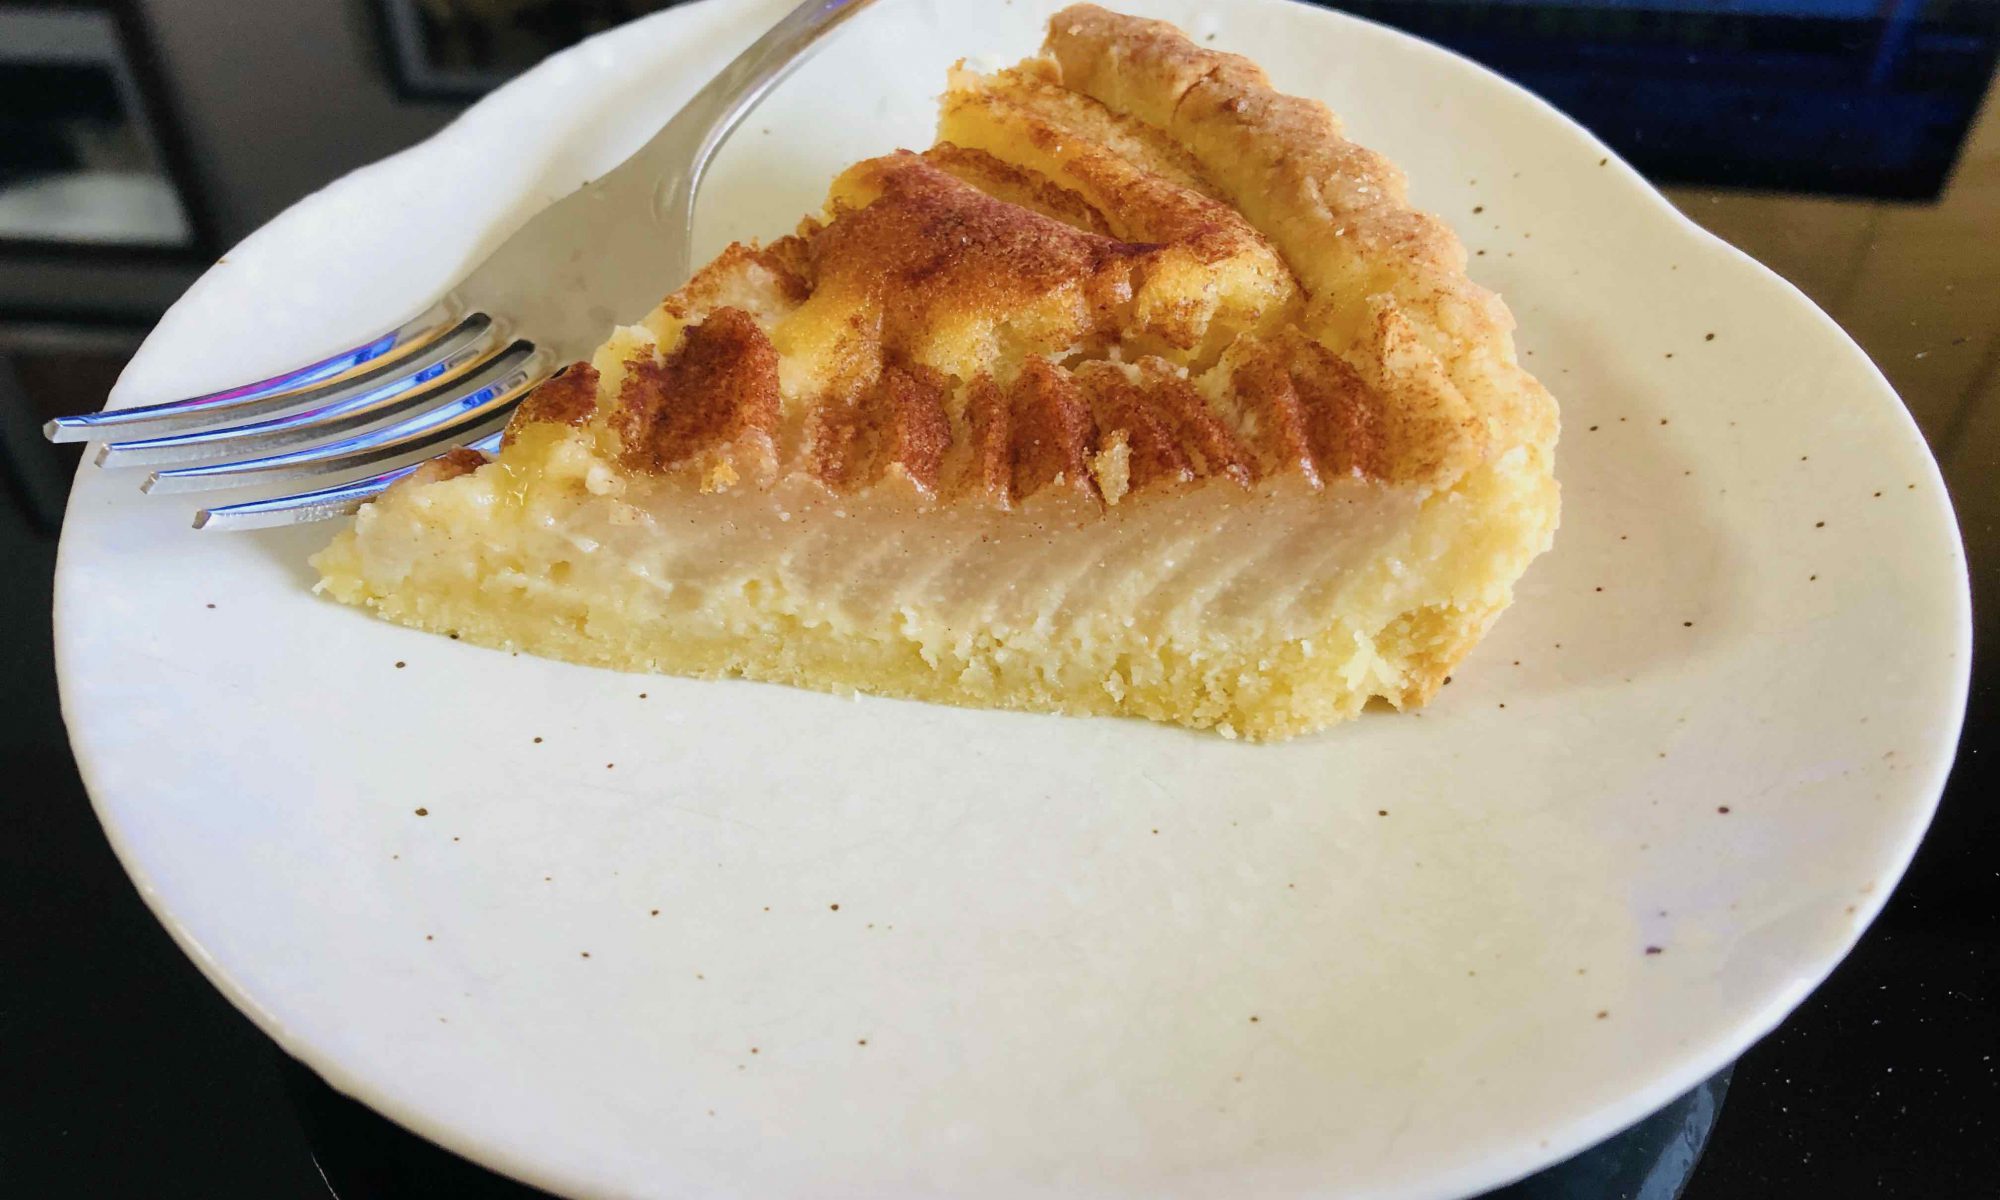
<4>梨のタルト Ver.01
前もってオーブンを180℃に予熱しておきます。 ①冷蔵庫で寝かしておいたタルト皿にアーモンドクリームを充填します。 ②薄切りスライスにしたフレッシュな梨を渦巻き状に盛り付けます。 ③ブラシで表面にエッグウオッシュします。溶き卵1個分を使用しますが、香り付けにダークラムやブランデーを5ml加えて攪拌するか、インスタントコーヒーを加えてコーヒードリュールとするのがいいかもしれません(好みの問題です)。 ④オーブンで180℃ x 30分前後焼きます。途中で表面の焦げ目が強く出るようならアルミフォイルで表面を覆って焼きます。十分に火が通ればタルト皿がモールド(焼型)から浮き上がりますのである程度焼き時間の目安となります。 ⑤濡らしたタオルの上に天板ごとオーブンから出して冷まします。 ⑥タルト皿がの温度が下がってきたら、クーリングラックの上に移動して室温で冷まします。 ⑦焼き型から外して皿に移し冷蔵庫で3時間ほど冷まして完成です。底板をタルトから外す時はパレットナイフを用いて割れないように慎重に分離します。
Pear Tart Version 1 : Preheat the oven up to 180C. ① Fulfill the tart crust with the almond cream (creme d’amandes). ② Slice the pear into 5mm width. Place it as you like ( ie. tornade). ③ Combine 5 gram dark rum and 1 beaten egg. Egg-wash the surface with a brush. ④ Oven-bake at 180C for about 30 minutes. ⑤ Let it cool at room temperature. Then chill it in a fridge for at least 3 hours.
<5>梨のタルト Ver.02
前もってオーブンを180℃に予熱しておきます。 ①芯をくり抜いた梨を少し厚めにスライスします。3等分または4等分に縦割りした梨がお手頃なサイズのスライスになります。 ②タルト皿にアーモンドクリームを充填した後、下図のように梨を盛り付けます。 ③溶かしバター20グラム分を表面にブラシで塗ります。 ④オーブンで180℃ x 30分前後焼成します。 この盛り付け方は、カットした時の断面が美しく梨のタルトではお気に入りです。サムネの写真はこれが上がっています。
Pear Tart Version 2 : Preheat the oven uo to 180C. ① Slice the pear ( previously removed its core ) vertically. ② Fulfill the crust with the almond cream. Place the sliced pear like the second picture with about 60 degrees tilted. ③ Brush the surface with melted butter usually in 20 gram prepared. ④ Oven-bake at 180C for about 30 minutes.
Pear Tart Version 3 : ① Place aluminum foil over the tart crust. Put a ramekin over a plate of a cake pan on the aluminum foil for weight. ② Oven-bake at 170C for 15 minutes. Remove the plate and the foil, add further oven-bake at 170C for 15 minutes. ③ Let the baked crust cool at room temperature. ④ Meanwhile, electric-whisk 100 gram heavy cream and 15 gram superfine sugar in a metal bowl until the firm peak form. Pour 100 gram fig puree and continue electric-whisking until well incorporated. Dump 100 gram cream cheese into it . Electric-whisk until the no streak of the cream cheese can be seen. Pour 8 gram powdered gelatin with 40 gram warm water into the cream cheese to electric-whisk until well combined. ⑤ Fill the crust with the cream cheese mousse. ⑥ Slice the compote pear and place it on the surface of the tart. ⑦ Chill it in a fridge overnight.
3つのバージョンのタルトを作成しました。これらは基本技術の組み合わせ(= Building Method)で構成されますのでこの辺がきっちりしてくると数式を変形するがごとくいろいろなオリジナルな作品を作成できます。
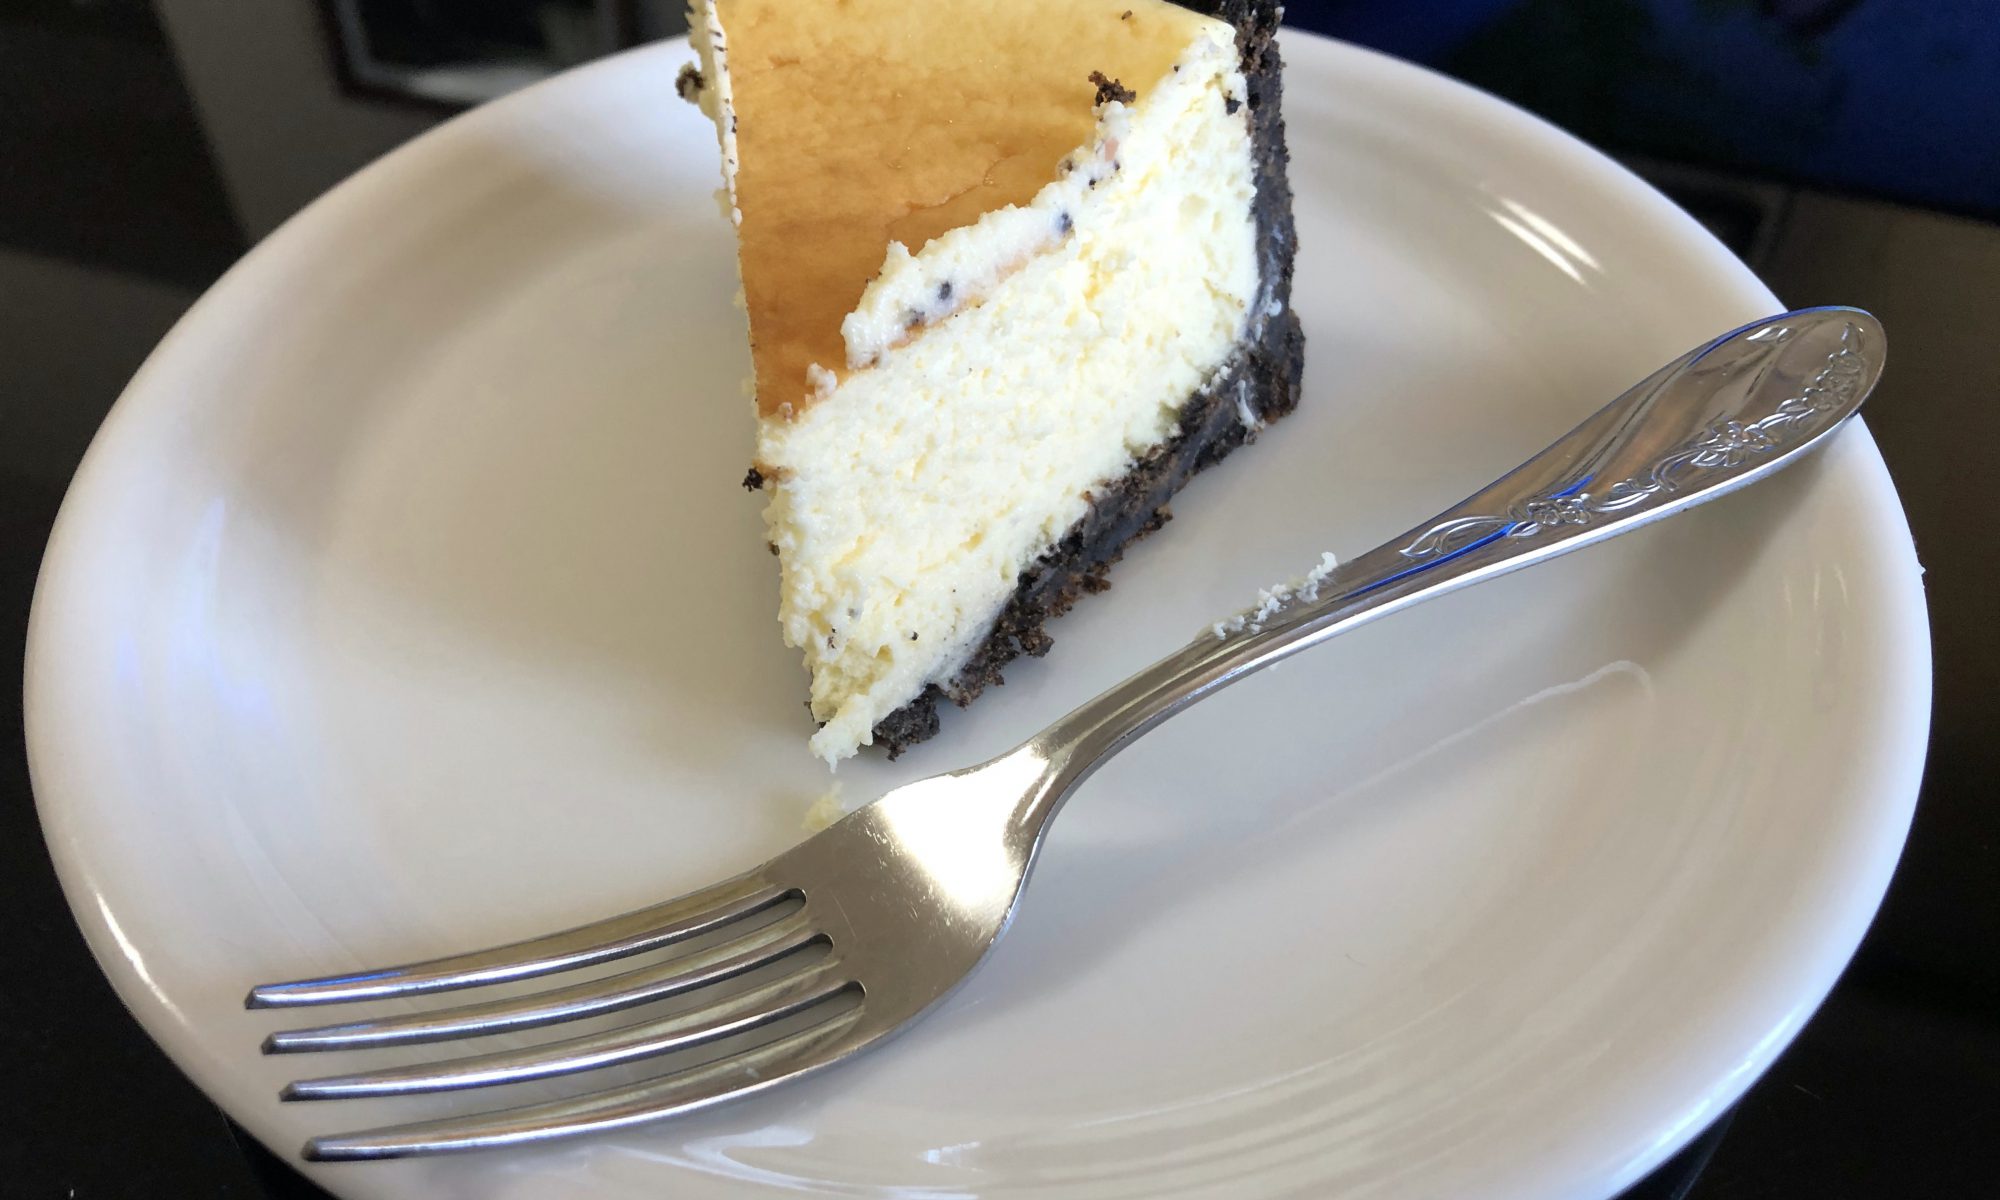
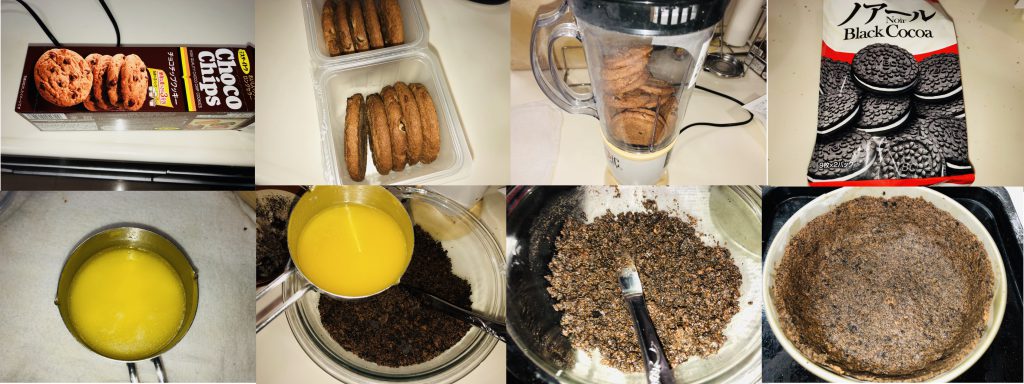
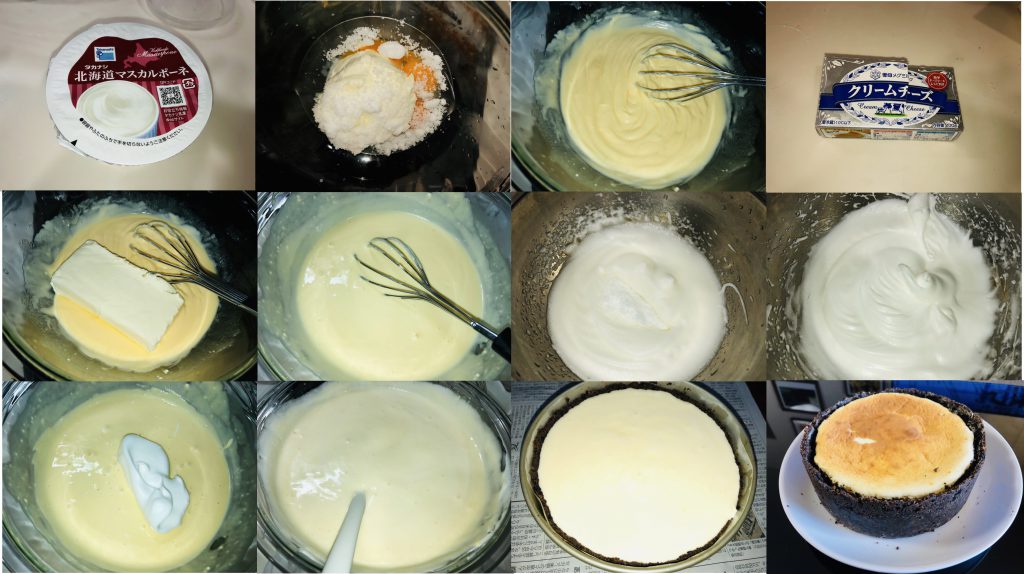
Making Chocolate Cookie Crust : Line parchment paper on the bottom and the side of φ18cm round springform cake pan, beforehand. Preheat the oven up to 180C. ① Put all of “Choco Chips” (207 gram) into a mixer to crush it into powder. ② Remove vanilla cream from Noir with a knife, that is supposed to be combined with Mascarpone Cream cheese . ③ Put all of the black cocoa cookies of Noir into the mixer to crush it into powder and mix it with the Choco Chips powder. ④ Prepare 120 gram butter melted over medium heat. ⑤ Power the melted butter into the blended powder to mix well. Dump it into the mold (cake pan) to make a cookie crust. Press the cookie dough with a spoon firmly and evenly to make a high lateral wall. ⑦ Let it cool for 30 minutes in a fridge. ⑧ Oven-bake at 180C within 10 minutes (about 7 minutes). ⑨ Keep it in a fridge until use.
<2>マスカルポーネクリームの作成 クリーチーズを混ぜきるまでBain-marieで行います。 ①全卵3個分を卵黄と卵白に分けます。卵白は使用時まで冷蔵しておきます。 ②大型耐熱ボウルに卵黄3個(60グラム)、上白糖35グラムを入れBain-marieで砂糖が十分に解けるまで加熱します。 ②砂糖が解けたらマスカルポーネ250グラムを加え、フラワーホイッパーで混ぜます。この時バニラオイルを数滴加えます。 ③マスカルポーネが均等に混ざったらクリームチーズ200グラムを混ぜます。この時ビスケットから取り除いたクリームも混合します。均等にまざったら過熱を止めて室温に放置します。 ④中型ボウルに卵白3個分を入れ、白ワインビネガーを3グラム、塩0.5グラムを加えます。電動ホイッパーでsoft peakまで攪拌する。 ⑤上白糖をtotal 35グラム加え、stiff peakまで混合します。砂糖は常法に基づき2回に分けて混合します。 ⑥メレンゲとマスカルポーネをスパチュラを用いて丁寧に混合していきます。混合は中心から外側、下から上方向に丁寧にスパチュラを動かします(center to margin, down to up fold method)。 ⑦均等になったところで冷蔵庫に保存しておいたクラストに注ぎます。 ⑧オーブンで160℃で45分焼成します。室温で冷ました後、冷蔵庫に一晩おいておきます。
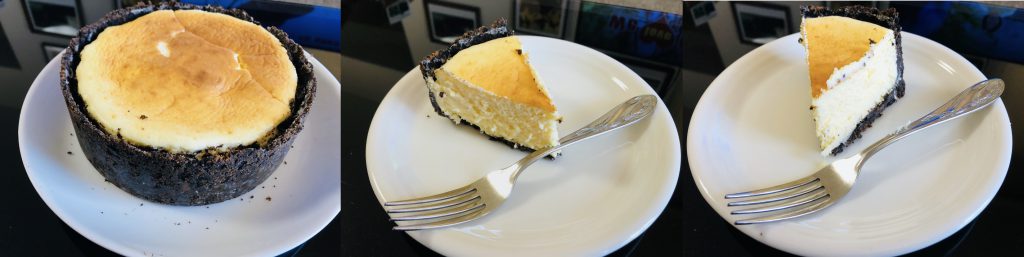
Preparing Mascarpone Cream cheese : The following procedure is performed under Bain-marie until cream cheese has got incorporated with Mascarpone. ① Separate egg yolks from egg whites. Keep egg whites in a fridge until use. ② Place 3 egg yolks (60 gram) and 35 gram superfine sugar into a large bowl and whisk well over simmering water in a sauce pan (Bain-marie) until the sugar is completely resolved.. ③ Add 250 gram Mascarpone with a few drops of vanilla oil and whisk until well incorporated. ④ Add 200 gram cream cheese with all of the previously removed vanilla cream (65 gram) and whisk well until the no streak of the cream cheese is seen. Then remove from heat to keep it at room temperature. ⑤ Place 3 egg whites and 3 gram white wine vinegar, 0.5 gram salt in a middle bowl. Electric-whisk until the soft peak form. ⑥ Gradually adding 35 gram superfine sugar in 2 batches, electric-whisk until the stiff peak form. ⑦ Combine the Mascarpone cream cheese mixture and the stiff peak meringue with folding it gently with a spatula according to the center to margin, down to up folding method. ⑧ Pour the batter into the cookie crust. Oven-bake at 160C for 45 minutes, Chill it in a fridge overnight.
Notice: The cocoa powder used in this recipe is not “pure cocoa powder”, coming up with ” high-bitter cocoa” commercially. Peach compote juice is previously made ( →see the section “peach compote”.)
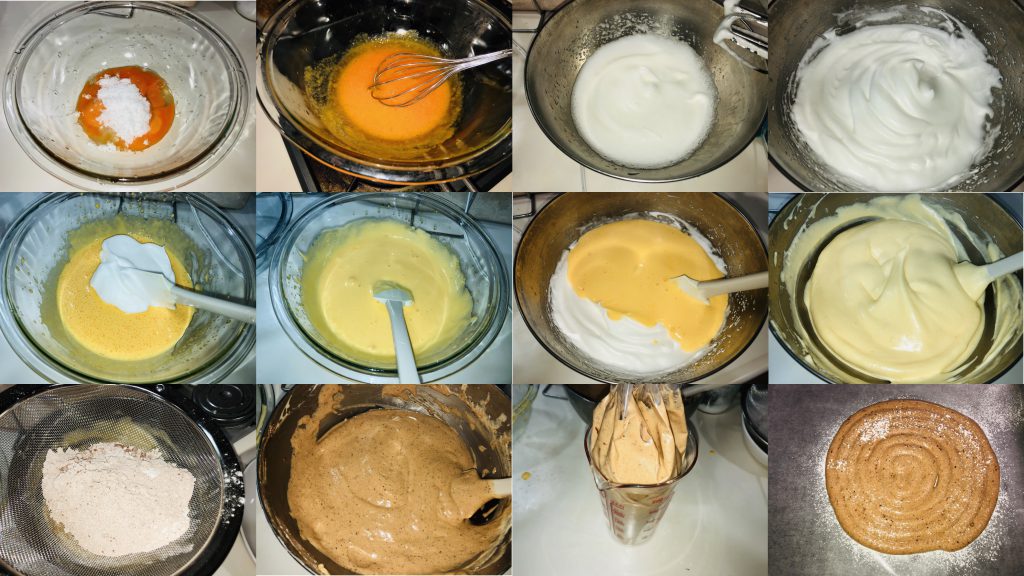
<ビスキュイ=レディーフィンガーの作成> ①卵黄5個、上白糖45グラムを耐熱大ボウルに入れ、フラワーホイッパーでBain-marrieで十分混合します。 ②卵白5個、白ワインビネガー3グラムをメタルボウルに入れ電動ホイッパーでsoft peakまで泡立てします。 ③上白糖を2回に分けて加えながらstiff peakまでメレンゲを仕上げます。 ④泡立て卵黄とメレンゲをgo back methodに従い合わせていきます。この時バニラオイルを適量加えて卵臭さを中和しておきます。 ⑤薄力粉82グラム、ココアパウダー8グラムを上から篩い、スパチュラで丁寧に混ぜます。 ⑥絞り袋に生地を移し、クッキングシートの上にティラミス作成のとき同様にφ18cmの円と6 x 20 cm長方形x2個に生地を絞ります。表面にパウダーシュガーを2回篩います。 ⑦オーブンで190℃ X 約10分焼成します。焼きあがったらクーリングラックの上で室温で冷まします。 ⑧生地が冷めたら用意した焼き型に合うようにはさみで生地をトリミングします。今回は側面は三角形に整えてみました。焼き型にセットします。
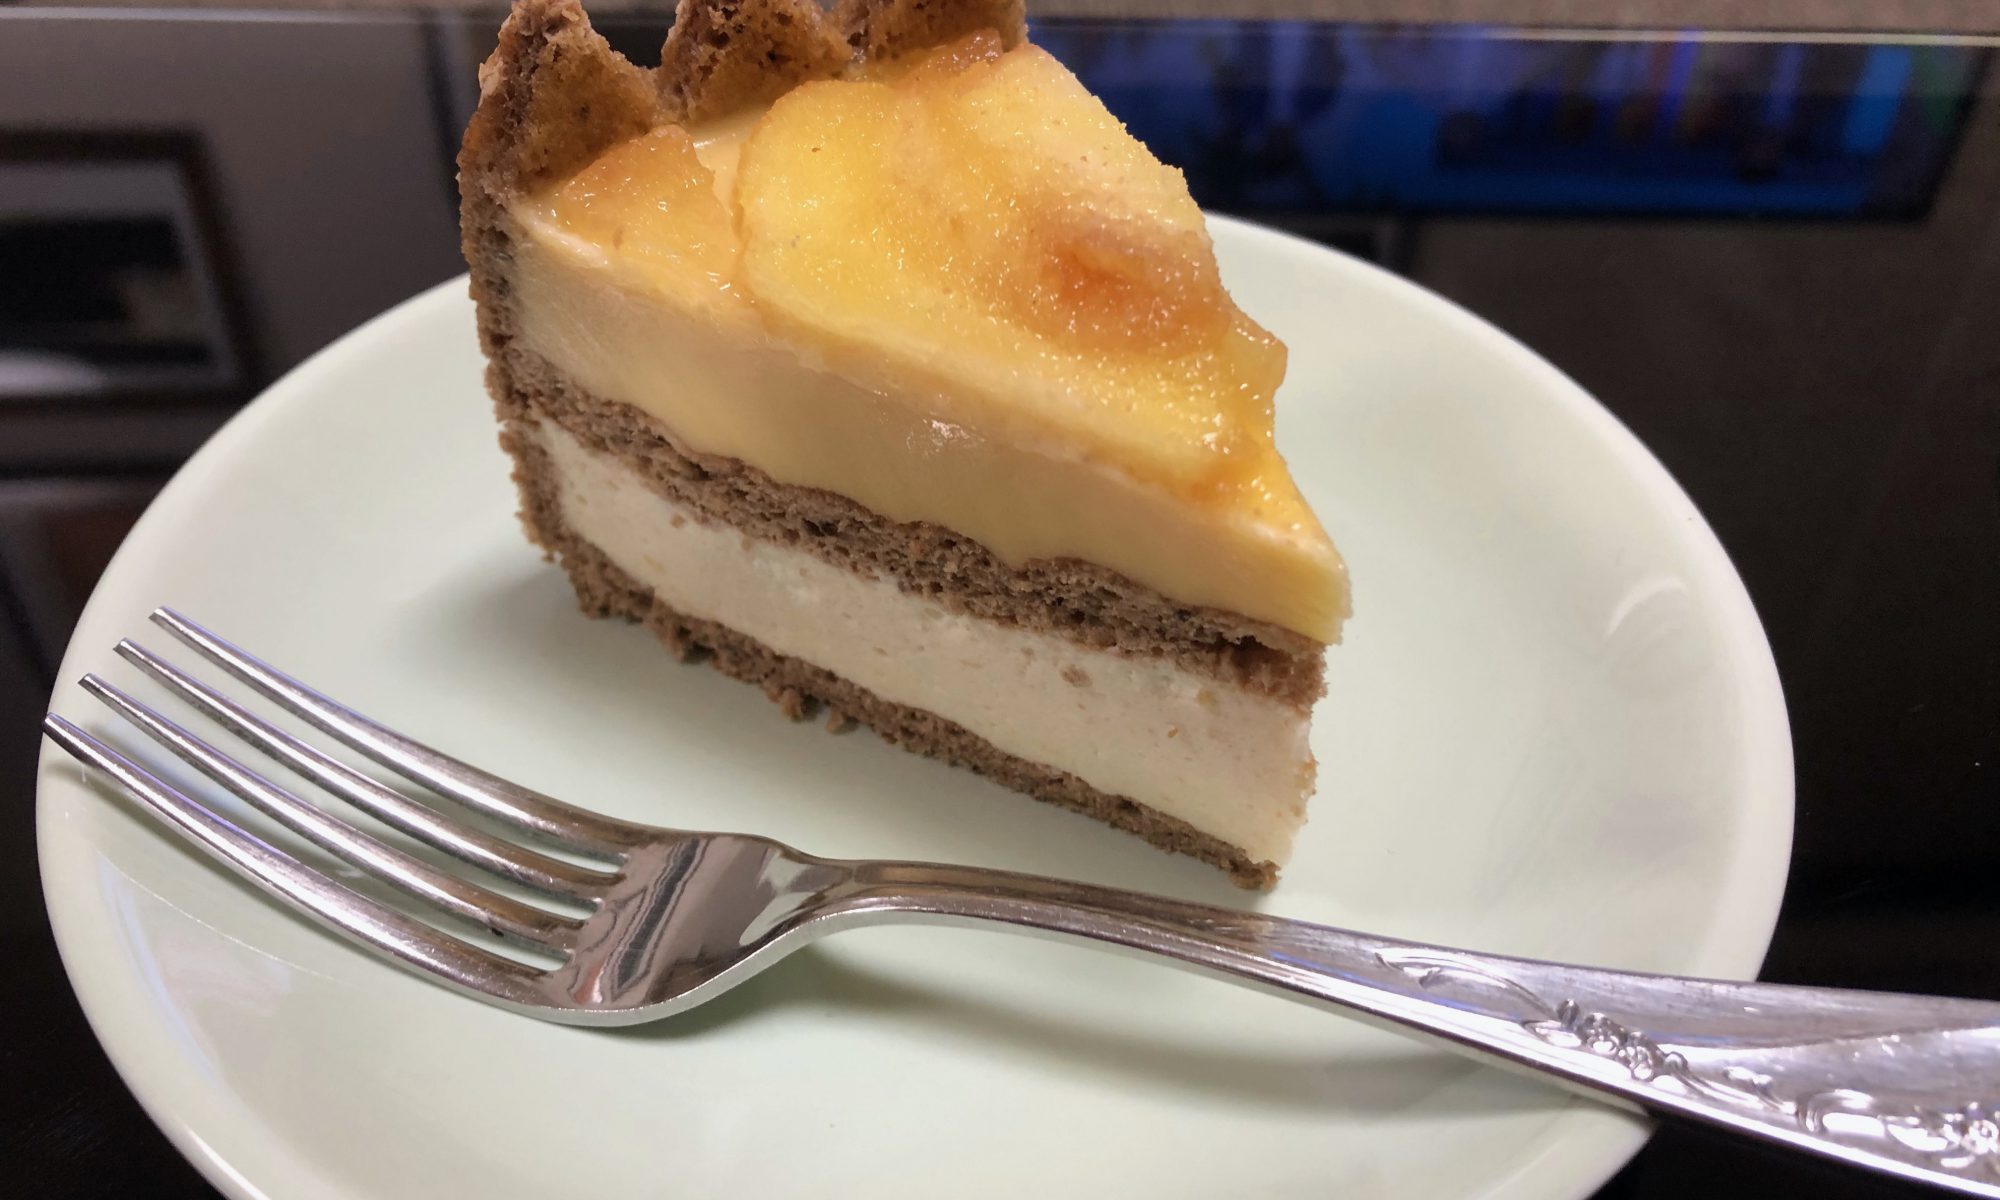
Preparing Lady-finger sponge cake ; 1. Place 5 egg yolks and 45 gram superfine sugar in a middle bowl and whisk until sugar is completely dissolved, over simmering water in a saucepan ( Bain-marie ). 2. Place 5 egg whites and 3 gram white wine vinegar in a metal bowl. Electric-whisk until soft peak form. Gradually adding 45 gram superfine sugar ( in 2 batches), continue electric-whisk until stiff peak form. 3. According to ” go back method”, gently fold the egg yolk mixture into the stiff peak meringue. Add a few drops of vanilla oil to decrease the smell of egg. 4. Sift 82 gram cake flour and 8 gram cacao powder over the egg yolk mixture. Fold gently so as not to deflate the meringue. 5. Transfer the batter into a pastry bag. Pipe 2 sets of the round (φ 18 cm) and the rectangular ( 6 x 18 cm ) with φ 1 cm width on a parchment paper. Sprinkle powder sugar appropriately over the dough twice. 6. Oven-bake at 180C for about 10 minutes until the surface gets golden brown. 7. Cool it on the cooling rack at room temperature. 8. Trim it as you like, but carefully re-size the round-shaped cake just fitting to the internal diameter of the sponge cake dome.
Making Peach Cream Cheese Mousse : 1. Cast 8 gram powder gelatin into the 40 gram peach compote ( prepared beforehand) and bloom it in a small cup. Keep it cool in a fridge until use. 2. Pour 100 gram cold heavy cream in a metal bowl and add 20 gram superfine sugar. Electric-whisk until stiff peak form. 3. Dump 100 gram cream cheese into the whipped cream in 4 batches. Electric-whisk until no streak of the cream cheese can be seen. 4. Electric-blend 128 gram fresh peach ( 1 ea.) into puree. Pour it into the cream cheese mixture. Electric-whisk until well incorporated. 5. Heat the pre-bloomed gelatin until completely dissolved. Pour it into the cream cheese mixture and electric-whisk until smooth. The peach cream mousse has done. 6. Pour the mousse all into the sponge cake dome. Place the round-shaped cake over the mousse.
Making Peach Bavarois : 1. Cast 10 gram powder gelatin into the 50 gram peach compote and bloom it. Chill it in a fridge until use. 2. Place 3 egg yolks and 20 gram superfine sugar into a large bowl and whisk it well. 3. Pour 200 gram heavy cream and the 150 gram peach compote into a saucepan over medium heat to bring it to a boil. 4. Gradually pouring the hot cream into the egg mixture with stirring continuously to temper it. 5. Go back the mixture into the saucepan over medium-low heat. Whisk continuously until it gets slightly thicken. Stay cautious not to get burned by frequent boiling up. 6. Exchange the balloon whipper for a spatula and continue to concentrate. When the dough gets enough thicken to draw a line on the surface of the spatula with your finger, the dough has done. 7. Remove from heat and transfer the dough into the bowl. Chill it in a fridge to stop further baking.
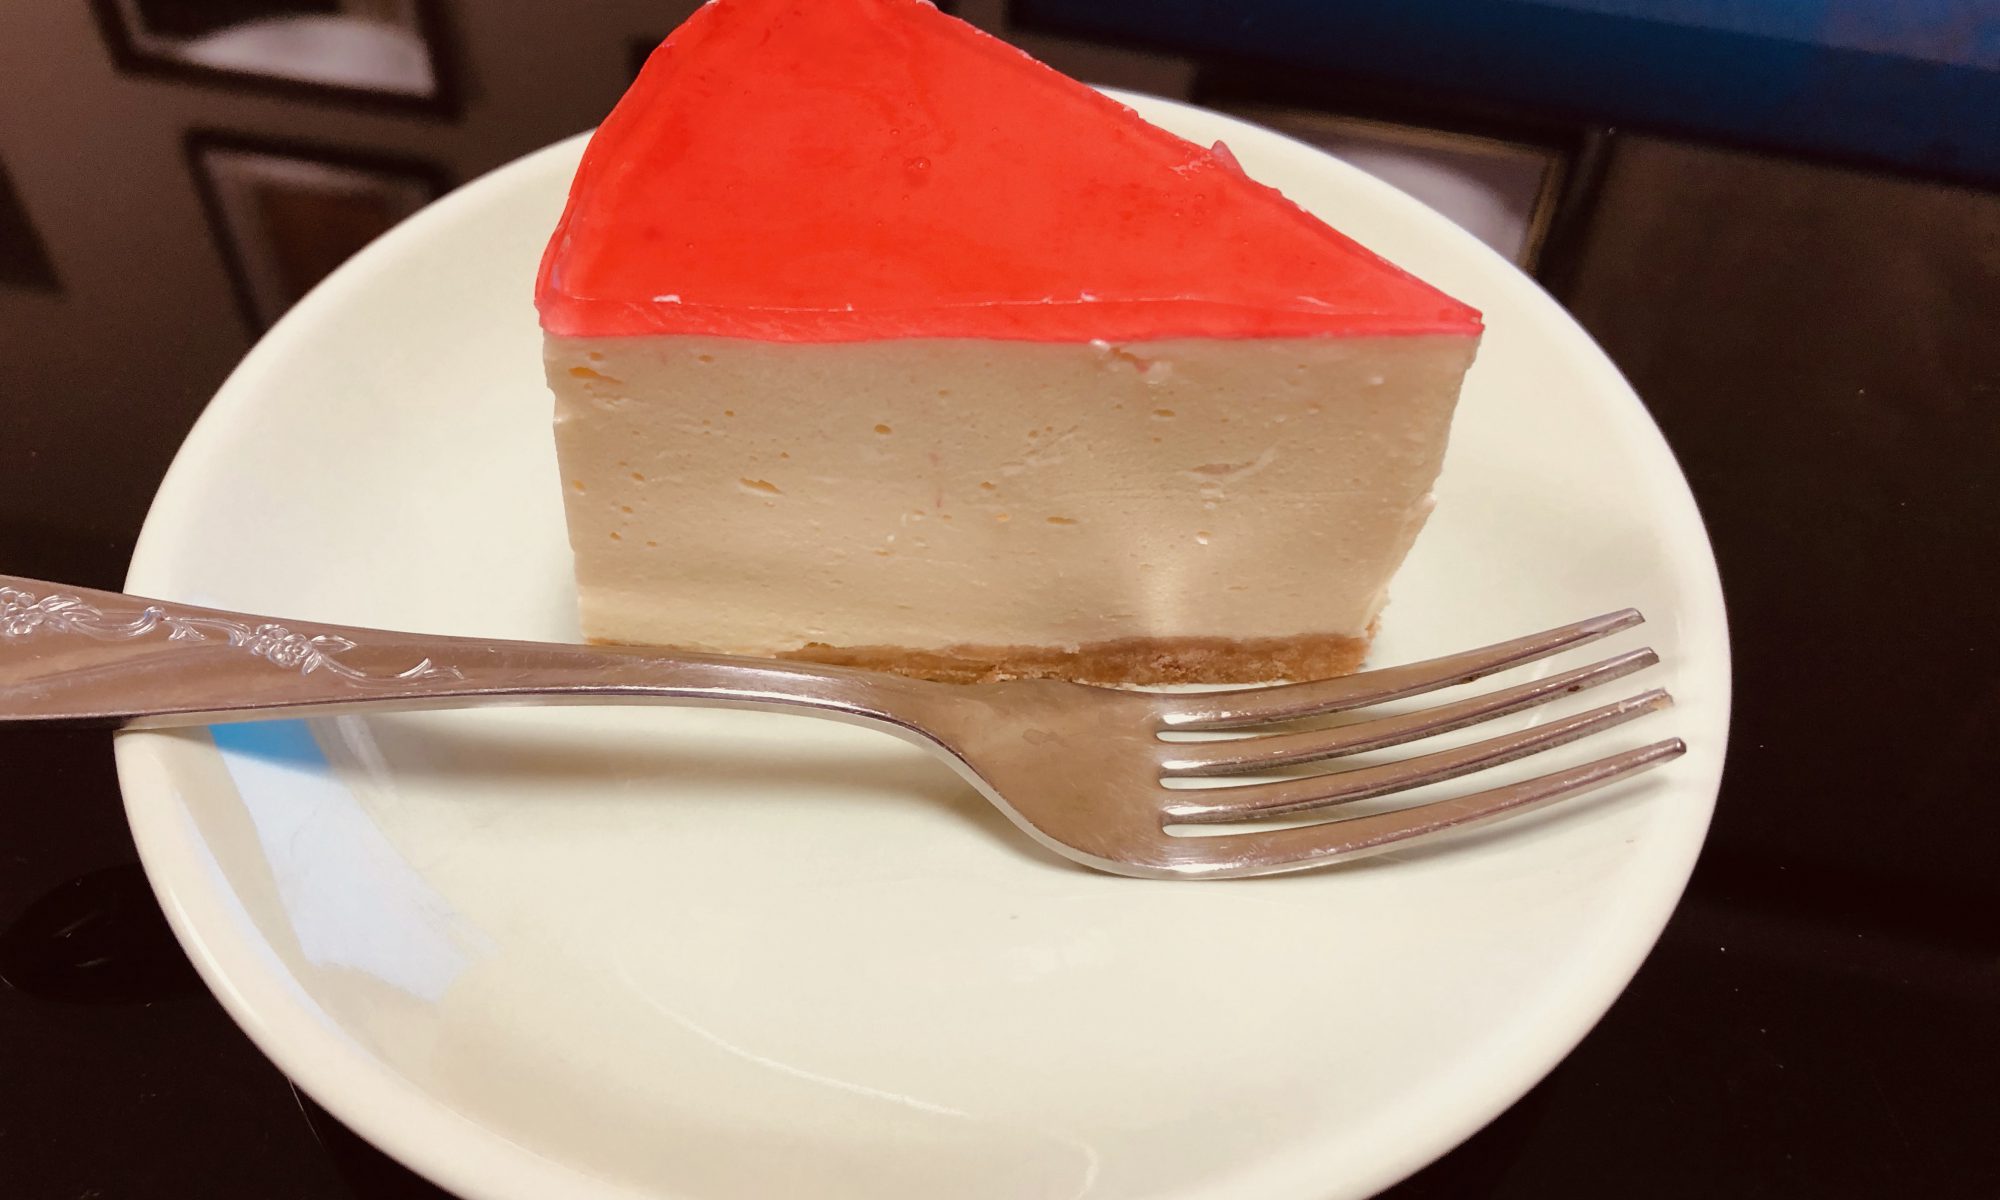
Assembling ⑧ Take the peach cream out from the fridge when its temperature gets as low as body temperature. Warm the bloomed gelatin until it gets resolved, mix well into the peach compote cream. ⑨ Pour it into the dome and chill it in a fridge overnight to confirm the bavarois gets firm. ⑩Slice a fresh peach and set on top. Pour nappage over it.
Note that : About 2.5% powder gelatin (weight per total weight) is applied for the cream cheesecake mousse, and 3% for the top gelatin layer, respectively. 5 fold volume of cold water (per gelatin used) should be prepared for blooming although the product instruction suggests to use 10 fold volume for solvent..
Preparing for Biscuit Plate : ① Line parchment paper on the bottom and side of a φ18 cm cake pan. ② Dump 120 gram biscuit into a mortar to crush into powder with a pestle rod. ③ Pour 60 gram melted butter and mix it well. ④ Place the powdered biscuit on the bottom of the cake pan to press it tightly to be flatten with a spoon. Chill it in a fridge until use.
Making Cream Cheese Mousse : ⑤ Pour 200 gram cold heavy cream into a large bowl and add 20 gram superfine sugar. Electric-whisk until the stiff peak form. ⑥ Divide 200 gram cream cheese into 4 parts. Dump the divided cream cheese one by one into the whipped cream and electric-whisk thoroughly until no streak of the cream cheese is not seen. ⑦ Meanwhile, pour 15 gram powder gelatin into 75 gram water and bloom it. Chill it in a fridge. ⑧ Pour 100 gram peach compote into the cream cheese mixture, and electric-whisk until well incorporated. ⑨ Carefully warm the bloomed gelatin to reverse into the liquid form. Pour the liquid gelatin into the cream cheese mixture and electric-whisk until well incorporated, ⑩ Pour the final mixture into the cake pan and flatten the surface with a palette knife. ⑪ Chill it in a fridge until the surface gets firm for about 3 hours. ⑫ Prepare 3 gram gelatin into 15 gram cold water to be bloomed. ⑬ Leave 83 gram peach compote at room temperature and add subtle volume of food color to add vivid red color. ⑭ Warm the gelatin into the liquid, and mix it into the peach compote. Pour the peach compote mixture over the top of the cheesecake. Let it chill in a fridge overnight.